Advanced CLI
Fine-Tune SSH/Telnet CLI Parameters
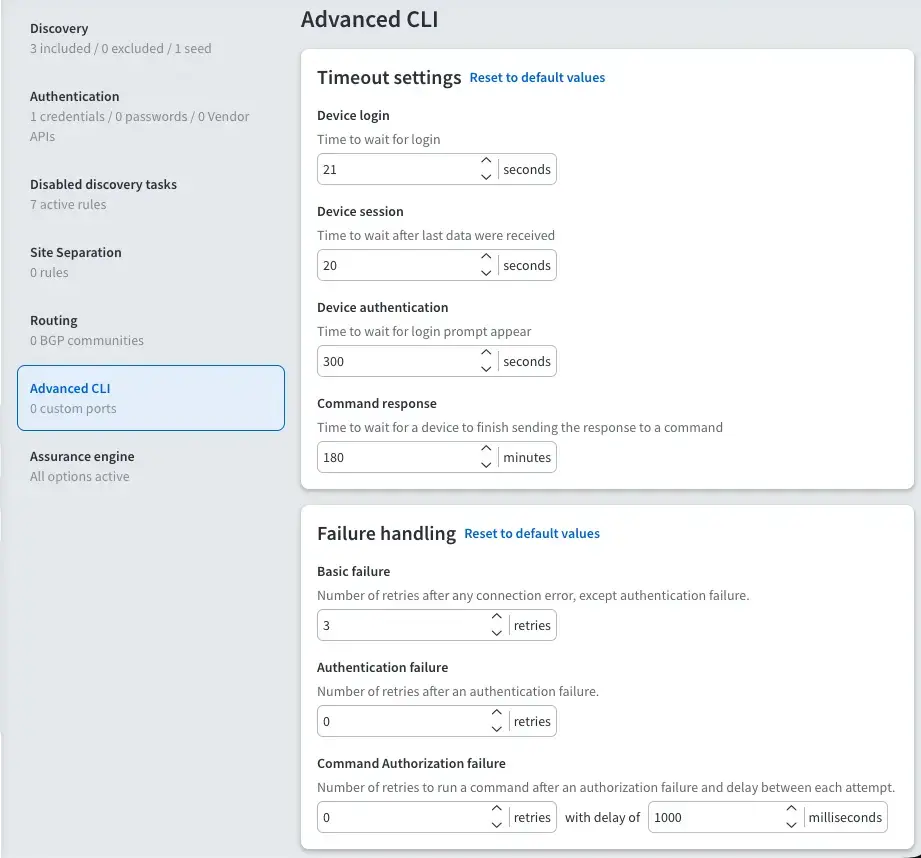
IP Fabric primarily uses the Command-Line Interface (CLI) for discovering network elements. The CLI parameters can be found in Settings → Discovery & Snapshots → Discovery Settings → Advanced CLI.
Tip
If you see many examples of Authentication error during discovery, adjust Authentication failure and Command Authorization Failure retries.
Network Device Login Timeout
Timeout before the logging prompt is received. It may take longer for remote branches over low-speed lines or overloaded devices to respond.
The default value is 20 seconds.
Network Device Session Timeout
If there are too many Command Timeout errors during the discovery process, it may indicate that the Network device session timeout is too short, and the session is closed before the response arrives. It may be necessary to increase this timeout.
The default value is 20 seconds.
Network Device Authentication Timeout
How many seconds to wait for the login prompt to appear.
The default value is 300 seconds.
This option was introduced because, in rare cases, IoT devices were constantly sending data without the command prompt appearing. This led to never-ending discovery.
Command Response Timeout
How many minutes to wait for a device to finish sending the response to a command.
The default value is 180 minutes.
This option was introduced because, in rare cases, network devices affected by a bug never stopped sending outputs for a command. This led to never-ending discovery.
Basic Failure
This setting determines how many times to retry a connection for any error, except authentication failure.
The default values is 3 retries.
Authentication Failure
Authentication failure can occur even if a user is authorized to log in. For example, this may happen when an AAA server is overloaded, or an authentication packet is lost.
The default value is 0 retries.
Maximum Number of Parallel Sessions
To prevent flooding your network with too many SSH/Telnet sessions, set the Maximum number of parallel sessions. This setting can also be helpful if the AAA server (TACACS/Radius) has a limit of parallel AAA requests for users.
This option is disabled by default. If enabled, the default value is 200 parallel sessions.
In rare cases, Cisco ISE or similar systems may rate limit command authorization. If there are too many authorization failures and Cisco ISE is in place, try limiting the number of parallel sessions to 10 and steadily increasing.
Command Authorization Failure Retries
How many times try to send the same command after authorization failure, and the delay before the next attempt.
The default value is 0 retries.
If any retries (>0) are set, the default delay before the next retry is 1000 ms (milliseconds; i.e., 1 second).
Examples of Error Messages in Connectivity Report
According to the Summary of issues in the very first completed snapshot, CLI Settings can be adjusted. Here are some of the most common errors and adjustments:
| Error | Error Type | How To Mitigate |
|---|---|---|
connect ETIMEDOUT XX.XX.XX.XX:22 |
Connection error | Received no response from the destination. |
connect ECONNREFUSED XX.XX.XX.XX:22 |
Connection error | The connection to the destination is being blocked by an access-list or firewall. |
All configured authentication methods failed |
Authentication error | Unable to authenticate to the destination host. |
Authentication failed |
Authentication error | Unable to authenticate to the destination host. |
Authentication failed - login prompt appeared again |
Authentication error | Unable to authenticate to the destination host. |
SSH client not received any data for last 120000 ms! cmd => show vrrp \| e #^$ |
Command timeout | The show vrrp \| e #^$ command timed out. Increase the Network device session timeout. |
Can't detect prompt |
Command timeout | Unable to detect the CLI prompt. Increase the Network device login timeout. |
Command "enable" authorization failed, tried 2x |
Command authorization failure | The command wasn’t authorized. Increase the Command Authorization Failure retries or increase the timer value (ms). |
Custom SSH/Telnet Ports
Info
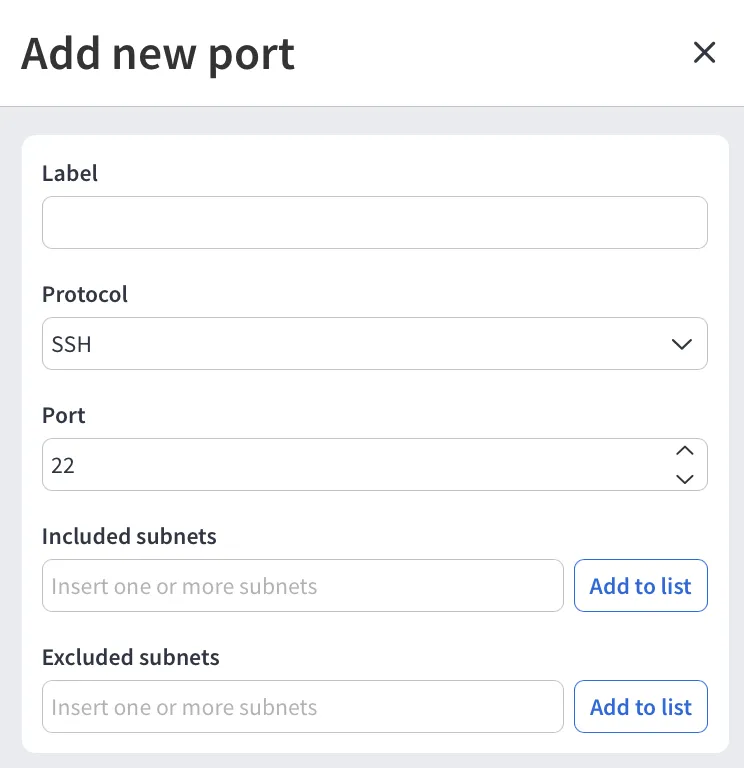
Custom SSH/Telnet ports settings enable the discovery process to use different ports for connecting. The standard ports for SSH and Telnet are 22 and 23, respectively. You can use both IPv4 and IPv6 subnets.
In the following example, we configure the discovery process to use port 8080
for SSH connections to 192.168.168.10:
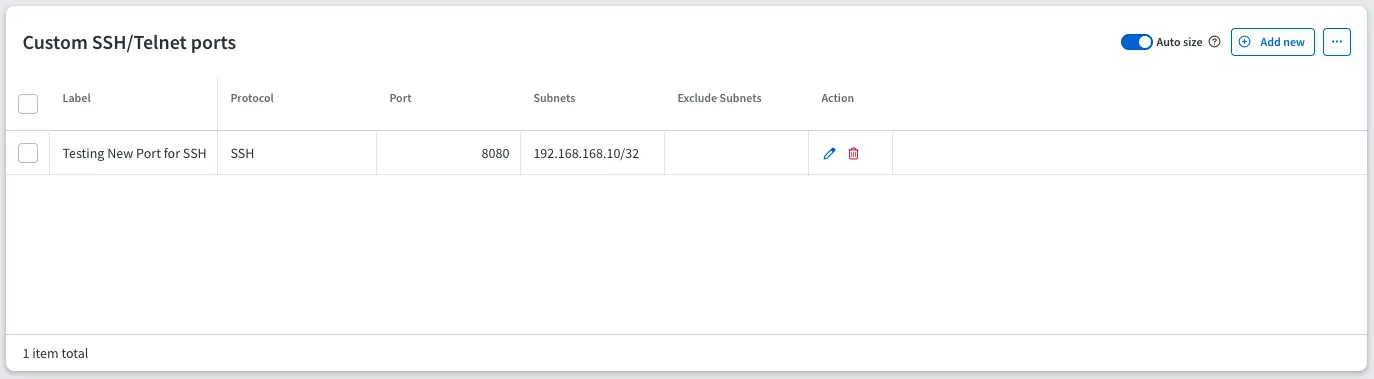
As a result of such configuration, a new item will be created in the Custom SSH/Telnet ports table, which will be applied to every new snapshot created in IP Fabric.
Telnet/SSH URL Handler on MS Windows 7 and Later
If you want to be able to connect directly to a device from the IP Fabric web interface, you need to register a Telnet/SSH URL handler. You will be touching the Windows Registry, so please ensure that you know what you are doing, have appropriate backups, and are comfortable doing so.
Backup Windows Registry
- Click Start, type
regedit.exein the search box, and then pressEnter. - In the Registry Editor, select File → Export.
- In the Export Registry File dialog, select the location where you want to save the backup copy, name your backup file, and click Save.
PuTTY
Download PuTTY
- Go to https://www.chiark.greenend.org.uk/~sgtatham/putty/latest.html.
- Download PuTTY.
- This tutorial expects PuTTY being in
C:\Program Files (x86)\putty.exe.
Register Telnet/SSH URL Handler
- Go to https://gist.github.com/sbiffi/11256316.
- Download the
putty.regfile. - In
putty.reg, edit the path to PuTTY if it differs fromC:\Program Files (x86)\putty.exe. - Download
putty.vbs(save it toC:\putty.vbsor change this path inputty.regabove). - In
putty.vbs, edit the path to PuTTY if it differs fromC:\Program Files (x86)\putty.exe. - Launch
putty.regto associatessh://andtelnet://to this script.
SecureCRT
Download SecureCRT
SecureCRT is not free software. To obtain a SecureCRT license, please visit https://www.vandyke.com/products/securecrt/.
Register Telnet/SSH URL Handler
- Download securecrt.reg.
- Edit the path to SecureCRT if it differs from
C:\Program Files\VanDyke Software\SecureCRT\SecureCRT.exe. - Launch
securecrt.regto associatessh://andtelnet://to SecureCRT.