Server Disk Space Summary
Starting with version 5.0.0, the IP Fabric appliance deploys as a single hard
disk installation instead of two disk volumes.
Starting with versions 7.3.23 and 7.5.11, all new installations utilize the GPT
disk partitioning scheme, while older versions and all pre-existing installations
utilise the MBR partitioning scheme.
The IP Fabric appliance uses LVM for the root and swap partitions. In a default installation, swap has 16 GB, and root has approximately 72 GB of disk space.
In the current versions we automatically resize the boot disk.
On appliances with the MBR partitioning scheme it works like this:
- Resize the primary partition to the full size of the disk.
- Resize the extended partition to the full size of the primary partition.
- Extend
ipfabric-vg/rootto+100%FREE. - Online resize the
ext4partition.
On appliances with the GPT partitioning scheme the process is similar, with one less step:
- Resize the system (LVM) partition to the full size of the disk.
- Extend
ipfabric-vg/rootto+100%FREE. - Online resize the
ext4partition.
Increasing Disk Space on IP Fabric Appliance
If you need any help with disk space expansion, please contact our Support team.
Resizing Root/First Disk
The easiest way to resize the IP Fabric system disk is to:
- Shutdown the VM.
- Resize the root/first disk to the desired size.
- Start the VM.
cloud-init will take care of resizing the disk.
Expanding System Volume by Adding Additional Disk(s)
If you want to add a secondary or any additional disk as a system disk, you will
need to manually add it to the ipfabric-vg/root volume.
To do that, follow these LVM resources:
Local Backup Disk
Backup Disk
The backup disk is not present by default! To enable local backups, please add a new virtual disk.
When enabling local backups, a
backup
tool creates backups in the /backup directory. The tool first checks if the
local backup directory exists, and then the backups are created.
Any additional disk (see the hypervisor-specific configurations at the bottom of
this page) can be mounted as the backup directory. For local backups, we
recommend using an additional disk located on a different datastore than the
root volume.
Warning
The backup disk must be partitioned with LVM. Specifically, the /backup
directory must be on the logical volume backup of the volume group
backup-vg.
Instructions To Mount a Physical Disk to the /backup Directory
Warning
Depending on your system, the name of your backup disk may vary. To find out
the name of your backup disk, you can use the lsblk command. In the
following steps 2 and 3, we will use vdb as an example of a backup disk
name. If your backup disk has a different name, please replace vdb with
the correct name in steps 2 and 3.
-
Find a device which you want to use as the
/backupdirectory. In this case,vdb.osadmin@ipfabric:~$ lsblk NAME MAJ:MIN RM SIZE RO TYPE MOUNTPOINT vda 254:0 0 76,3G 0 disk ├─vda1 254:1 0 487M 0 part /boot ├─vda2 254:2 0 1K 0 part └─vda5 254:5 0 75,8G 0 part ├─ipfabric--vg-swap_1 253:0 0 16G 0 lvm [SWAP] └─ipfabric--vg-root 253:1 0 59,8G 0 lvm / vdb 254:16 0 20G 0 disk # <-- We want to use this device for the /backup directory.On systems utilising the GPT partitioning layout, the
lsblkoutput may look different:osadmin@ipfabric:~$ lsblk NAME MAJ:MIN RM SIZE RO TYPE MOUNTPOINT vda 254:0 0 76,3G 0 disk ├─vda1 254:1 0 256M 0 part /boot/efi ├─vda2 254:2 0 1M 0 part ├─vda3 254:1 0 512M 0 part /boot └─vda4 254:5 0 75,5G 0 part ├─ipfabric--vg-swap_1 253:0 0 16G 0 lvm [SWAP] └─ipfabric--vg-root 253:1 0 59,5G 0 lvm / vdb 254:16 0 20G 0 disk # <-- We want to use this device for the /backup directory. -
Create an LVM physical volume on the disk
vdb:osadmin@ipfabric:~$ sudo pvcreate /dev/vdb Physical volume "/dev/vdb" successfully created. -
Create the volume group
backup-vg:osadmin@ipfabric:~$ sudo vgcreate backup-vg /dev/vdb Volume group "backup-vg" successfully created -
Use the entire size of the volume group
backup-vgto create the logical volumebackup:osadmin@ipfabric:~$ sudo lvcreate -n backup -l 100%FREE backup-vg Logical volume "backup" created. -
Create a filesystem (in this example,
ext4) on the logical volumebackup:osadmin@ipfabric:~$ sudo mkfs.ext4 /dev/mapper/backup--vg-backup mke2fs 1.46.2 (28-Feb-2021) Discarding device blocks: done Creating filesystem with 5241856 4k blocks and 1310720 inodes Filesystem UUID: 26bf3259-8421-4b67-ad27-71fa55e57af8 Superblock backups stored on blocks: 32768, 98304, 163840, 229376, 294912, 819200, 884736, 1605632, 2654208, 4096000 Allocating group tables: done Writing inode tables: done Creating journal (32768 blocks): done Writing superblocks and filesystem accounting information: done -
Create a new fstab entry (for example, using
sudo vi /etc/fstab):Info
We strongly recommend using only LVM partition LABELs and UUIDs in
fstab. For more information, see Persistent block device naming./dev/mapper/backup--vg-backup /backup ext4 defaults 0 0 -
Create the
/backupdirectory:sudo mkdir /backup -
The logical volume
backupcan now be mounted with:sudo mount /backup -
Finally, check the output of
lsblk:osadmin@ipfabric:~$ lsblk NAME MAJ:MIN RM SIZE RO TYPE MOUNTPOINT vda 254:0 0 76,3G 0 disk ├─vda1 254:1 0 487M 0 part /boot ├─vda2 254:2 0 1K 0 part └─vda5 254:5 0 75,8G 0 part ├─ipfabric--vg-swap_1 253:0 0 16G 0 lvm [SWAP] └─ipfabric--vg-root 253:1 0 59,8G 0 lvm / vdb 254:16 0 20G 0 disk └─backup--vg-backup 253:2 0 20G 0 lvm /backupor, on systems with GPT partitioning:
osadmin@ipfabric:~$ lsblk
NAME                    MAJ:MIN RM  SIZE RO TYPE MOUNTPOINT
vda                     254:0    0 76,3G  0 disk
├─vda1                  254:1    0  256M  0 part /boot/efi
├─vda2                  254:2    0    1M  0 part
├─vda3                  254:1    0  512M  0 part /boot
└─vda4                  254:5    0 75,5G  0 part
  ├─ipfabric--vg-swap_1 253:0    0   16G  0 lvm  [SWAP]
  └─ipfabric--vg-root   253:1    0 59,5G  0 lvm  /
vdb                     254:16   0   20G  0 disk
└─backup--vg-backup     253:2    0   20G  0 lvm  /backup
Increase Size of Backup Disk
Warning
Depending on your system, the name of your backup disk may vary. To find out
the name of your backup disk, you can use the lsblk command. In the
following step 6, we will use vdb as an example of a backup disk name. If
your backup disk has a different name, please replace vdb with the correct
name in step 6.
Suppose you prepared a backup disk with size of 20 GB with the instructions above, and you would like to increase its size (for example, to 40 GB).
-
Shutdown the IP Fabric appliance.
-
Increase the backup disk’s size at the hypervisor level (for example, to 40 GB).
-
Start the IP Fabric appliance.
-
Log in to the CLI as the
osadminuser. -
Check the status with
lsblk– notice that the diskvdbin this case has 40 GB, but the LVM logical volumebackupstill has only 20 GB:osadmin@ipfabric:~$ lsblk NAME MAJ:MIN RM SIZE RO TYPE MOUNTPOINT vda 254:0 0 76,3G 0 disk ├─vda1 254:1 0 487M 0 part /boot ├─vda2 254:2 0 1K 0 part └─vda5 254:5 0 75,8G 0 part ├─ipfabric--vg-swap_1 253:1 0 16G 0 lvm [SWAP] └─ipfabric--vg-root 253:2 0 59,8G 0 lvm / vdb 254:16 0 40G 0 disk └─backup--vg-backup 253:0 0 20G 0 lvm /backup -
Resize the LVM physical volume:
osadmin@ipfabric:~$ sudo pvresize /dev/vdb Physical volume "/dev/vdb" changed 1 physical volume(s) resized or updated / 0 physical volume(s) not resized -
Resize the LVM logical volume:
osadmin@ipfabric:~$ sudo lvextend -l +100%FREE /dev/backup-vg/backup Size of logical volume backup-vg/backup changed from <20,00 GiB (5119 extents) to <40,00 GiB (10239 extents). Logical volume backup-vg/backup successfully resized. -
Resize the filesystem:
osadmin@ipfabric:~$ sudo resize2fs /dev/mapper/backup--vg-backup resize2fs 1.46.2 (28-Feb-2021) Filesystem at /dev/mapper/backup--vg-backup is mounted on /backup; on-line resizing required old_desc_blocks = 3, new_desc_blocks = 5 The filesystem on /dev/mapper/backup--vg-backup is now 10484736 (4k) blocks long. -
Re-check the status with
lsblk:osadmin@ipfabric:~$ lsblk NAME MAJ:MIN RM SIZE RO TYPE MOUNTPOINT vda 254:0 0 76,3G 0 disk ├─vda1 254:1 0 487M 0 part /boot ├─vda2 254:2 0 1K 0 part └─vda5 254:5 0 75,8G 0 part ├─ipfabric--vg-swap_1 253:1 0 16G 0 lvm [SWAP] └─ipfabric--vg-root 253:2 0 59,8G 0 lvm / vdb 254:16 0 40G 0 disk └─backup--vg-backup 253:0 0 40G 0 lvm /backup -
Also, check the size of the filesystem:
osadmin@ipfabric:~$ df -h /backup
Filesystem                     Size  Used Avail Use% Mounted on
/dev/mapper/backup--vg-backup   40G   19M   38G   1% /backup
Remove Backup Disk
Danger
After following the instructions, all data on the backup disk will be lost!
Warning
Depending on your system, the name of your backup disk may vary. To find out
the name of your backup disk, you can use the lsblk command. In the
following step 6, we will use vdb as an example of a backup disk name. If
your backup disk has a different name, please replace vdb with the correct
name in step 6.
Suppose you have a backup disk prepared with the instructions above, and now you would like to remove it.
-
Find the backup disk you want to remove. In this case,
vdb.osadmin@ipfabric:~$ lsblk NAME MAJ:MIN RM SIZE RO TYPE MOUNTPOINT vda 254:0 0 76.3G 0 disk ├─vda1 254:1 0 487M 0 part /boot ├─vda2 254:2 0 1K 0 part └─vda5 254:5 0 75.8G 0 part ├─ipfabric--vg-swap_1 253:1 0 16G 0 lvm [SWAP] └─ipfabric--vg-root 253:2 0 59.8G 0 lvm / vdb 254:16 0 20G 0 disk # <-- We want to unconfigure and remove this device. └─backup--vg-backup 253:0 0 20G 0 lvm /backup -
Remove the
fstabentry (for example, usingsudo vi /etc/fstab):/dev/mapper/backup--vg-backup /backup ext4 defaults 0 0 -
Unmount the LVM logical volume
backup:sudo umount /backup -
Disable and remove the LVM logical volume
backup(you may check thesudo lvdisplayoutputs before and after running the commands):osadmin@ipfabric:~$ sudo lvchange -an /dev/backup-vg/backup osadmin@ipfabric:~$ sudo lvremove /dev/backup-vg/backup Logical volume "backup" successfully removed -
Disable and remove the LVM volume group
backup-vg(you may check thesudo vgdisplayoutputs before and after running the commands):osadmin@ipfabric:~$ sudo vgchange -an backup-vg 0 logical volume(s) in volume group "backup-vg" now active osadmin@ipfabric:~$ sudo vgremove backup-vg Volume group "backup-vg" successfully removed -
Remove the LVM physical volume on the disk
vdb(you may check thesudo pvdisplayoutputs before and after running the command):osadmin@ipfabric:~$ sudo pvremove /dev/vdb Labels on physical volume "/dev/vdb" successfully wiped. -
Verify with
lsblkthat the diskvdbhas been unconfigured:osadmin@ipfabric:~# lsblk NAME MAJ:MIN RM SIZE RO TYPE MOUNTPOINT vda 254:0 0 76.3G 0 disk ├─vda1 254:1 0 487M 0 part /boot ├─vda2 254:2 0 1K 0 part └─vda5 254:5 0 75.8G 0 part ├─ipfabric--vg-swap_1 253:1 0 16G 0 lvm [SWAP] └─ipfabric--vg-root 253:2 0 59.8G 0 lvm / vdb 254:16 0 20G 0 disk -
Shutdown the IP Fabric VM.
-
Remove the disk
vdbfrom the VM at the hypervisor level. -
Start the VM.
-
Verify with
lsblkthat the diskvdbis no longer present:osadmin@ipfabric:~$ lsblk NAME MAJ:MIN RM SIZE RO TYPE MOUNTPOINT vda 254:0 0 76.3G 0 disk ├─vda1 254:1 0 487M 0 part /boot ├─vda2 254:2 0 1K 0 part └─vda5 254:5 0 75.8G 0 part ├─ipfabric--vg-swap_1 253:0 0 16G 0 lvm [SWAP] └─ipfabric--vg-root 253:1 0 59.8G 0 lvm /
Deprecated Resize Wizard
The IP Fabric appliance with a version lower than 5.0 used two LVM volumes by
default: ipfabric-vg/root for system and data, and backup-vg/backup for
/backup.
The system and data volume was extended over two disks (usually the first two). For additional disks, you could choose to extend the root or backup volume. This option was discontinued in favor of one system/data disk with the possibility of adding a backup disk.
The original script is still present in the system, but we discourage its use as
it expects only the boot disk to be sda, sdb as extended ipfabric-vg/root,
and you could choose how sd[c-z] would be used. The new approach with one disk
is more versatile and is not limited to sd[a-z] disks.
Deprecated Script
This script should not be used anymore. The script also only supports the MBR partitioning scheme, and doesn’t work with the GPT partitioning scheme. You should run it only when you know what you are doing.
Script location: /opt/nimpee/sys-lvm-resize.sh
Increase Disk Space for VMware
Extend Existing Virtual Disk (for System and Data)
- Open the VMware vSphere web console.
- Right-click the VM name and select Edit Settings.
- Select Hard disk and change its size.
- Click OK.
- Restart the VM (using CLI or web UI).
- The disk space is automatically increased if you resized the first disk.
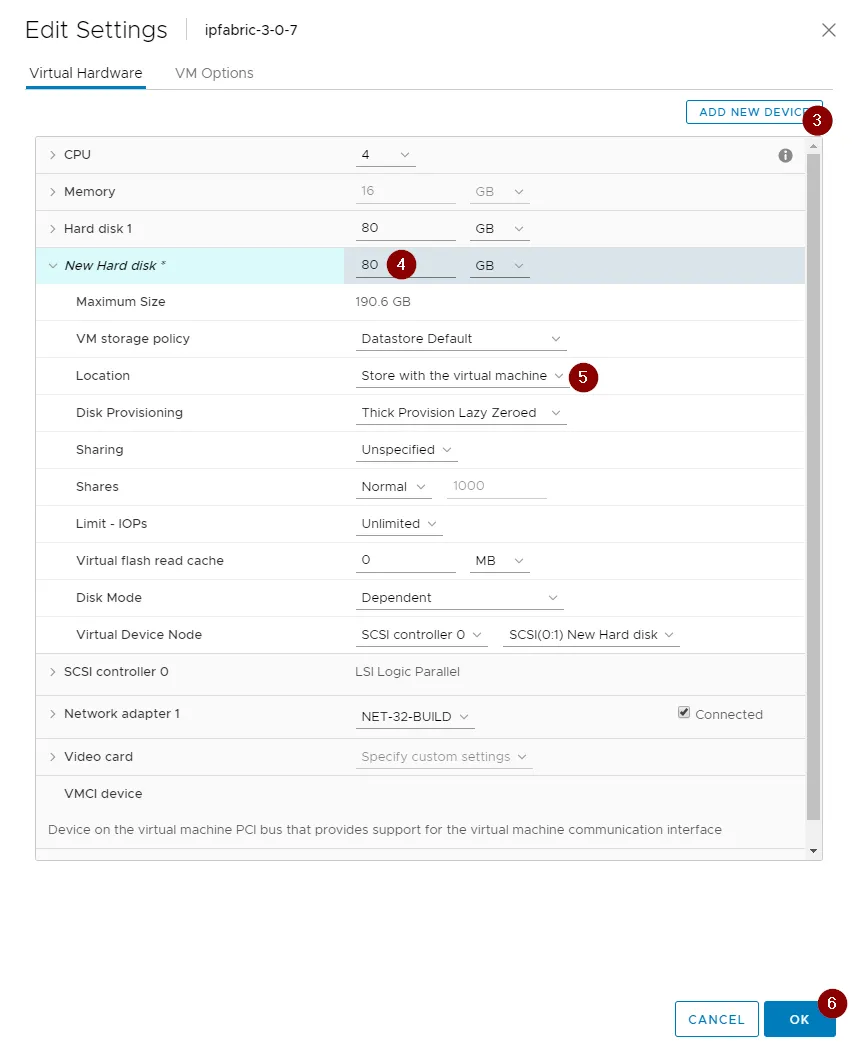
Add New Virtual Disk (as an Additional Backup Disk)
- Open the VMware vSphere web console.
- Right-click the VM name and select Edit Settings.
- Click Add New Device → New Hard disk.
- Specify the size.
- Specify the Location:
- For system disk expansion, it is recommended to select
Store with the
    virtual machine
. - For the backup volume, it is recommended to select a different datastore, ideally on different physical storage.
- For system disk expansion, it is recommended to select
- Click OK.
- Launch the Remote (Web) Console.
- Reboot (the Send Ctrl+Alt+Delete function can be also used) or power on the IP Fabric VM.
- Follow Adding additional disk(s) or Example adding disk to backup.
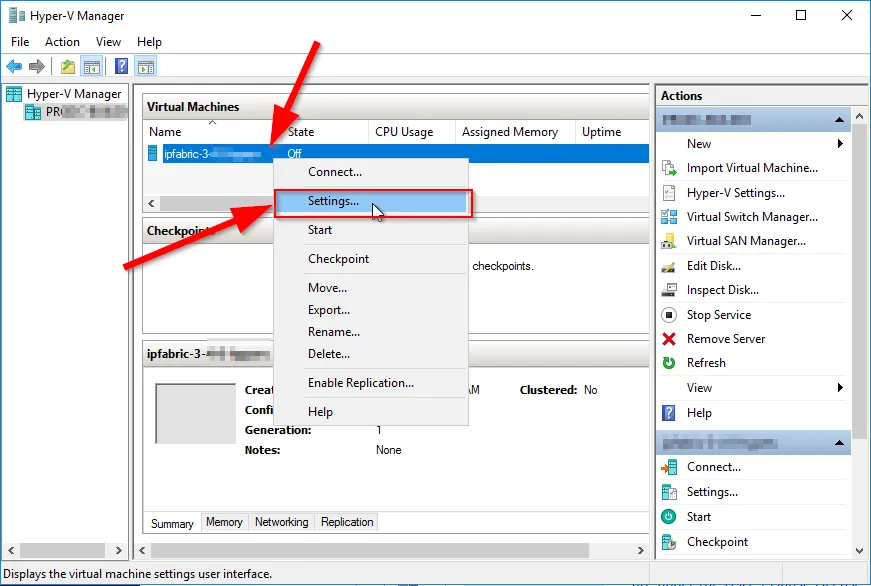
Increase Disk Space for Hyper-V
Extend Existing Virtual Disk (for System and Data)
- Open Hyper-V Manager.
- Shutdown the VM (Hyper-V won’t let you change hardware settings while it’s running).
- Right-click the VM name and select Settings.
- Select IDE Controller/SCSI Controller → Hard Drive → ipfabric-x-x-x.vhdx.
- Click Edit – Choose Action – select the option Expand, click Next.
- Set up the required disk size and click Finish.
- Start the VM.
- The disk space is automatically increased.
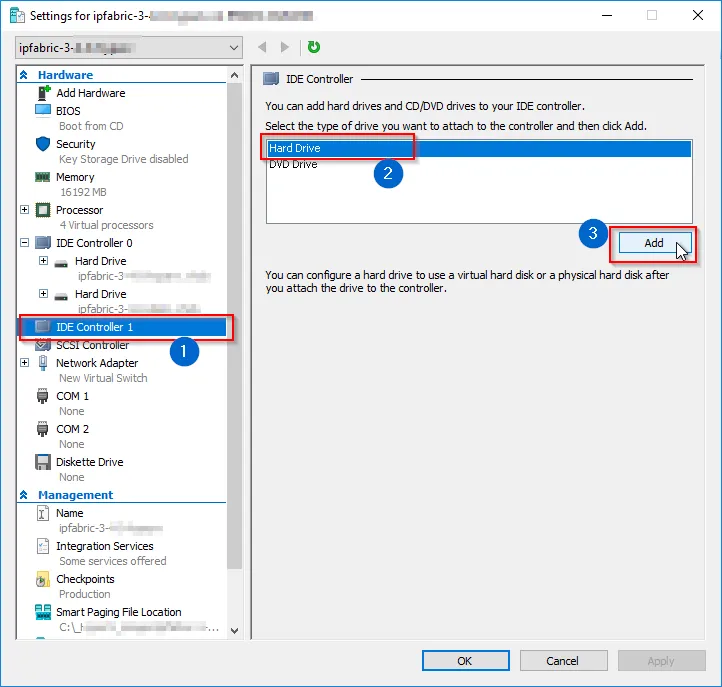
Add New Virtual Disk (as an Additional Backup Disk)
- Open Hyper-V Manager.
- Shutdown the VM (Hyper-V won’t let you change hardware settings while it’s running).
- Right-click the VM name and select Settings.
- Select IDE Controller 1/SCSI Controller → Hard Drive and click Add.
- Select Virtual hard disk and click New. In the
Choose Disk Formatstep, select VHDX and click Next.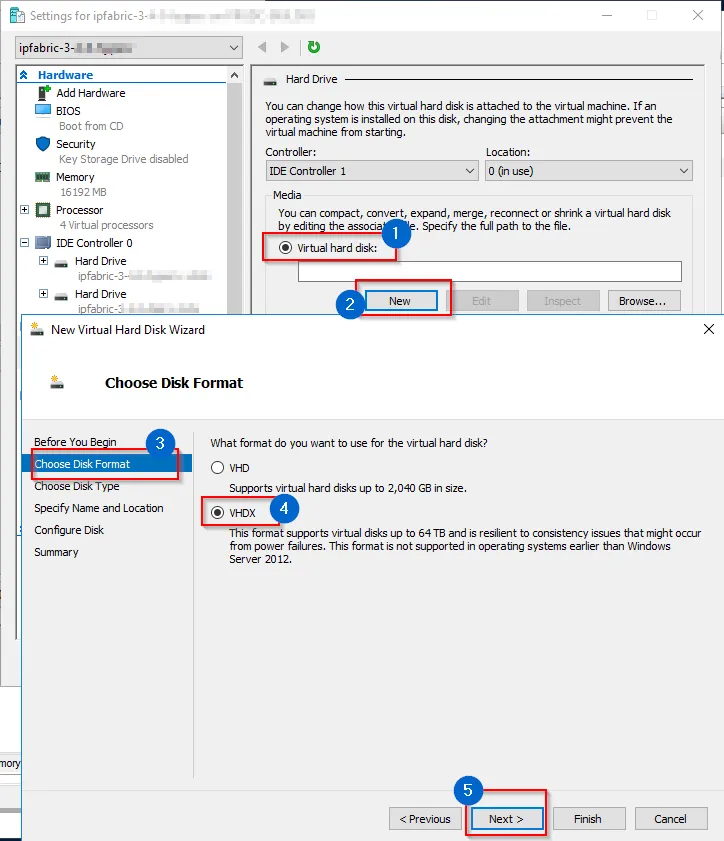
- In the
Choose Disk Typestep, select Dynamically expanding and click Next.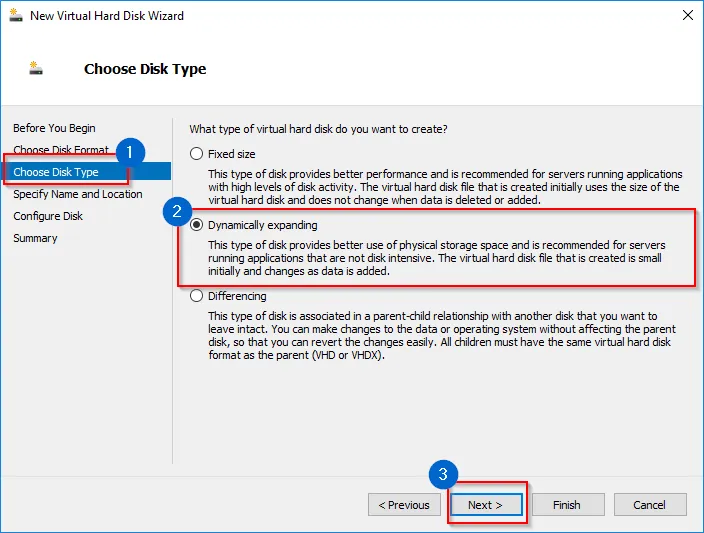
- Specify the name and location of the disk and click Next.
- In the
Configure Diskstep, select Create a new blank virtual hard disk, change the Size to the required value, and click Finish.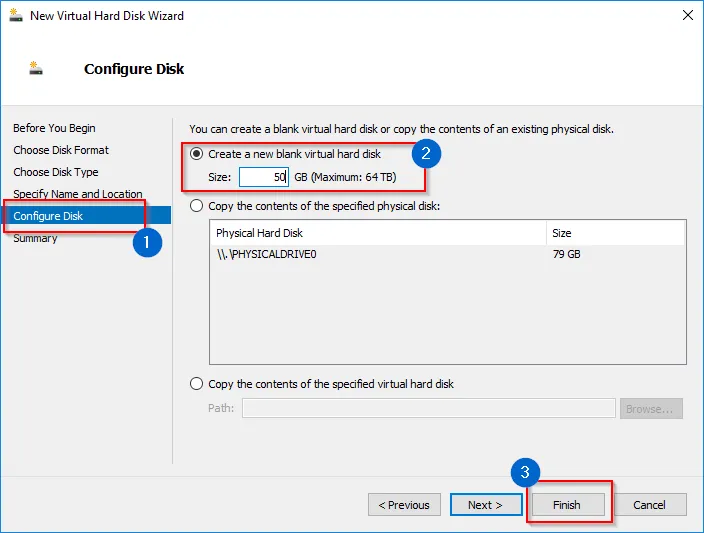
- Apply the new disk in the Settings window and close Settings.
- Start the VM.
- Follow Adding additional disk(s) or Example adding disk to backup.