Deploying IP Fabric Virtual Machine (VM)
All VM images are available at https://releases.ipfabric.io/images/. Access is restricted to registered customers only. Please contact our sales representative if you are interested in a trial of IP Fabric.
Important
Please remember that IP Fabric uses CLI access (SSH or Telnet) to connect to devices for collecting data. It’s important to place the VM in the proper network segment to prevent high ACL or firewall configuration overhead.
OVA Distribution Details
The appliance is built on top of Debian 12, which has been officially supported
since
ESXi version 8.0.
The minimal required Virtual Hardware Version is vmx-20, supported by ESXi
8.0, Fusion 13.6, Workstation Pro 17.x, and Workstation Player 17.x. For
details, see the VMware KB articles
1003746 and
2007240.
This system type is required because we need the virtio/paravirtualized drivers for storage and network:
Note that we also have requirements about the processor itself – see Hardware Requirements. These cannot be described through the OVA image definition.
If you do not use the virtio/paravirtualized drivers for storage and network, performance will be degraded.
Setting VM From Scratch – Importing VMDK Image
Importing VMDK is the recommended way.
If you do not have access to an ESXi host for importing, you can try to import the disk (VMDK) and set up the machine manually. Ensure the following are configured correctly:
- Virtual Hardware Version is at least
vmx-20 - virtio/paravirtualized drivers for storage and network
See the detailed instructions in Deploying VM on VMware ESXi Using VMDK Image.
Deploying Through vSphere or VxRail – Converting SHA256 OVA Image to SHA1
You may experience problems deploying through vSphere/VxRail. vSphere/VxRail is refusing the SHA256 version of our OVA image. When trying to create a virtual machine using the SHA1-based OVA image, you may experience problems with importing the image because of unsupported “hardware”. In this case, please see the next paragraph about deploying manually.
VMware’s KB article on converting OVA images: “The OVF package is invalid and cannot be deployed” error when deploying the OVA (2151537)
Importing SHA1-Based OVA Image
This might lead to unexpected results, such as wrong hardware assignments, degraded performance, etc.
operation not supported on this object
This states the inability to deploy the OVA image with the required hardware requirements through itself (vSphere). However, if the same OVA image is deployed through ESXi, no warnings are present while creating the virtual machine.
Deploying VM on VMware
Deploying VM on VMware vSphere Using OVA Image
- Deploy the OVA to your vSphere environment as described in Deploy an OVF or OVA Template.
- Edit VM settings and adjust according to your network size as described in the Operational Requirements section.
- Change CPU count.
- Change memory size.
- Add a new empty virtual disk or resize the main system disk.
- Power on the VM and complete IPF CLI Config.
Invalid OVF checksum algorithm: SHA256
Importing the OVA on older vSphere/ESXi hosts may result in an error stating that the OVF checksum is invalid. Please refer to OVA Distribution Details on how to resolve the issue.
Deploying VM on VMware ESXi Using VMDK Image
-
Go to https://releases.ipfabric.io/images/, select the folder with the highest version number, and download the
ipfabric-<x.y.z+build>.vmdkfile. -
Log in to the VMware ESXi web interface.
-
Select Virtual Machines and click Create / Register VM.
-
A
New virtual machinedialog appears. In its 1st stepSelect creation type, select Create a new virtual machine: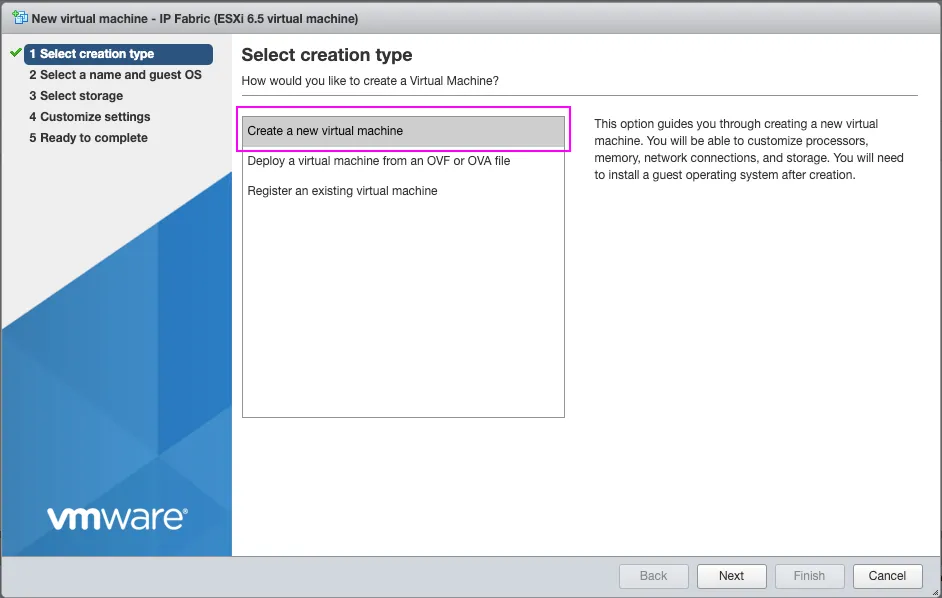
-
In the 2nd step
Select a name and guest OS:-
Specify the VM’s Name.
-
In the Compatibility field, select at least
ESXi 8.0 virtual
    machine
, which corresponds to the Virtual Hardware Version20(vmx-20). Refer to Virtual machine hardware versions for mapping between Virtual Hardware Versions and ESXi versions. -
In the Guest OS family field, select
Linux. -
In the Guest OS version field, select
Debian GNU/Linux 12 (64-bit).
Deploying VMDK on Older ESXi Systems
It is possible to deploy VMDK on older ESXi systems that do not support Debian 12. Please choose the latest available
Debian (64-bit)version. For the best experience, use a supported version of ESXi. -
-
In the 3rd step
Select storage, keep the default settings. -
In the 4th step
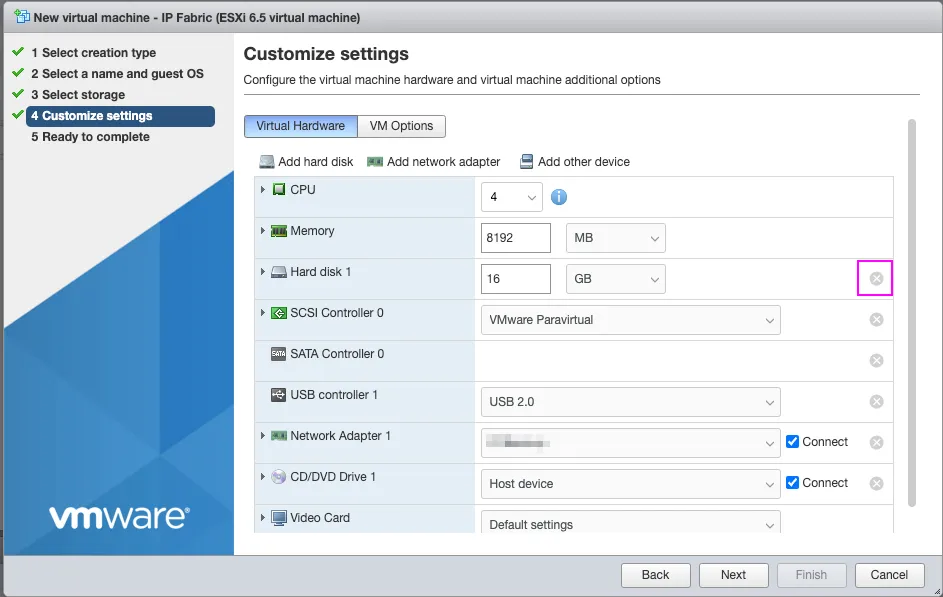
Customize settings:-
Remove the automatically added hard disk:
-
Change the SCSI Controller to
VMware Paravirtual(PVSCSI) and the Adapter Type under Network Adapter toVMXNET 3: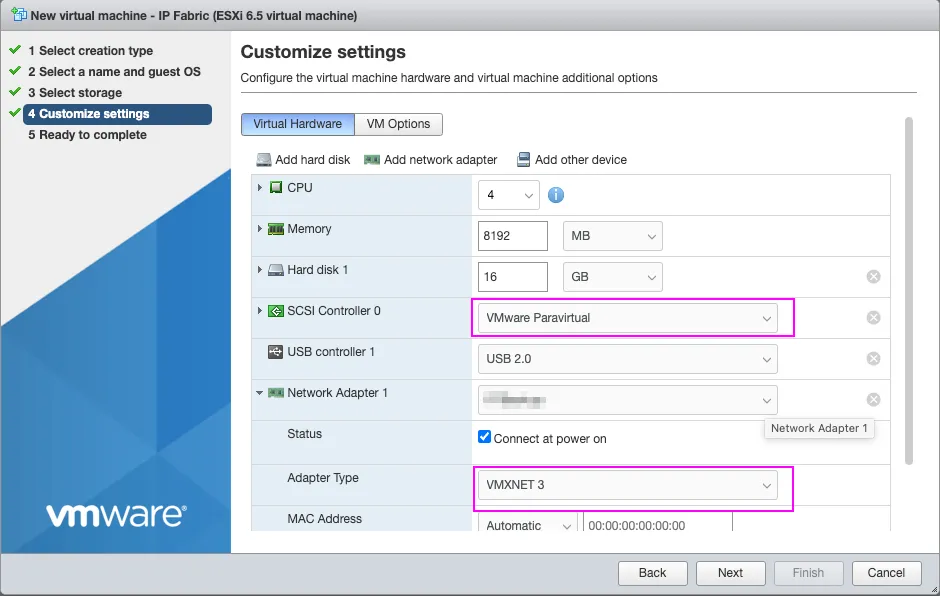
-
Click Add hard disk, select Existing hard disk, and import the downloaded
ipfabric-<x.y.z+build>.vmdkfile: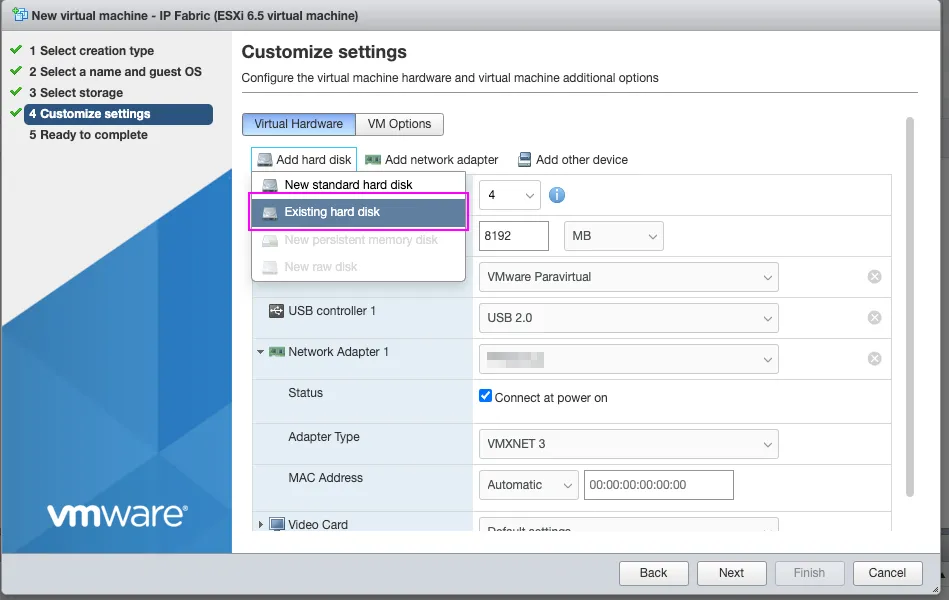
Unsupported and/or invalid disk type while importing VMDK
The disk format of the VMDK file may be incomatible with your ESXi version. To convert it to a compatible format, please refer to the VMware documentation for detailed instructions.
-
-
Power on the VM and complete IPF CLI Config.
Deploying a VM on Hyper-V
This section describes how to deploy the IP Fabric virtual appliance on Microsoft Hyper-V.
Generation 2 Version Requirement
Deployment using Generation 2 is supported only for new deployments running version 7.3.25, 7.5.14, 7.9.4, or newer.
Upgrading an existing Generation 1 VM to Generation 2 is not supported. A new VM deployment is required.
Prerequisites
- Download
ipfabric-*.vhdx.zstfrom the official source. - Decompress the archive to obtain the
ipfabric-*.vhdxdisk image. - Review the Operational Requirements.
Generation 1 Deployment
-
Open Hyper-V Manager and select New → Virtual Machine.
-
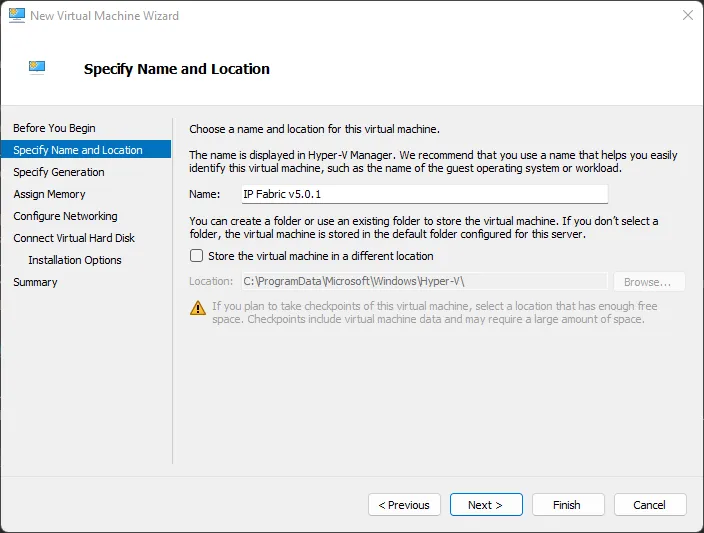
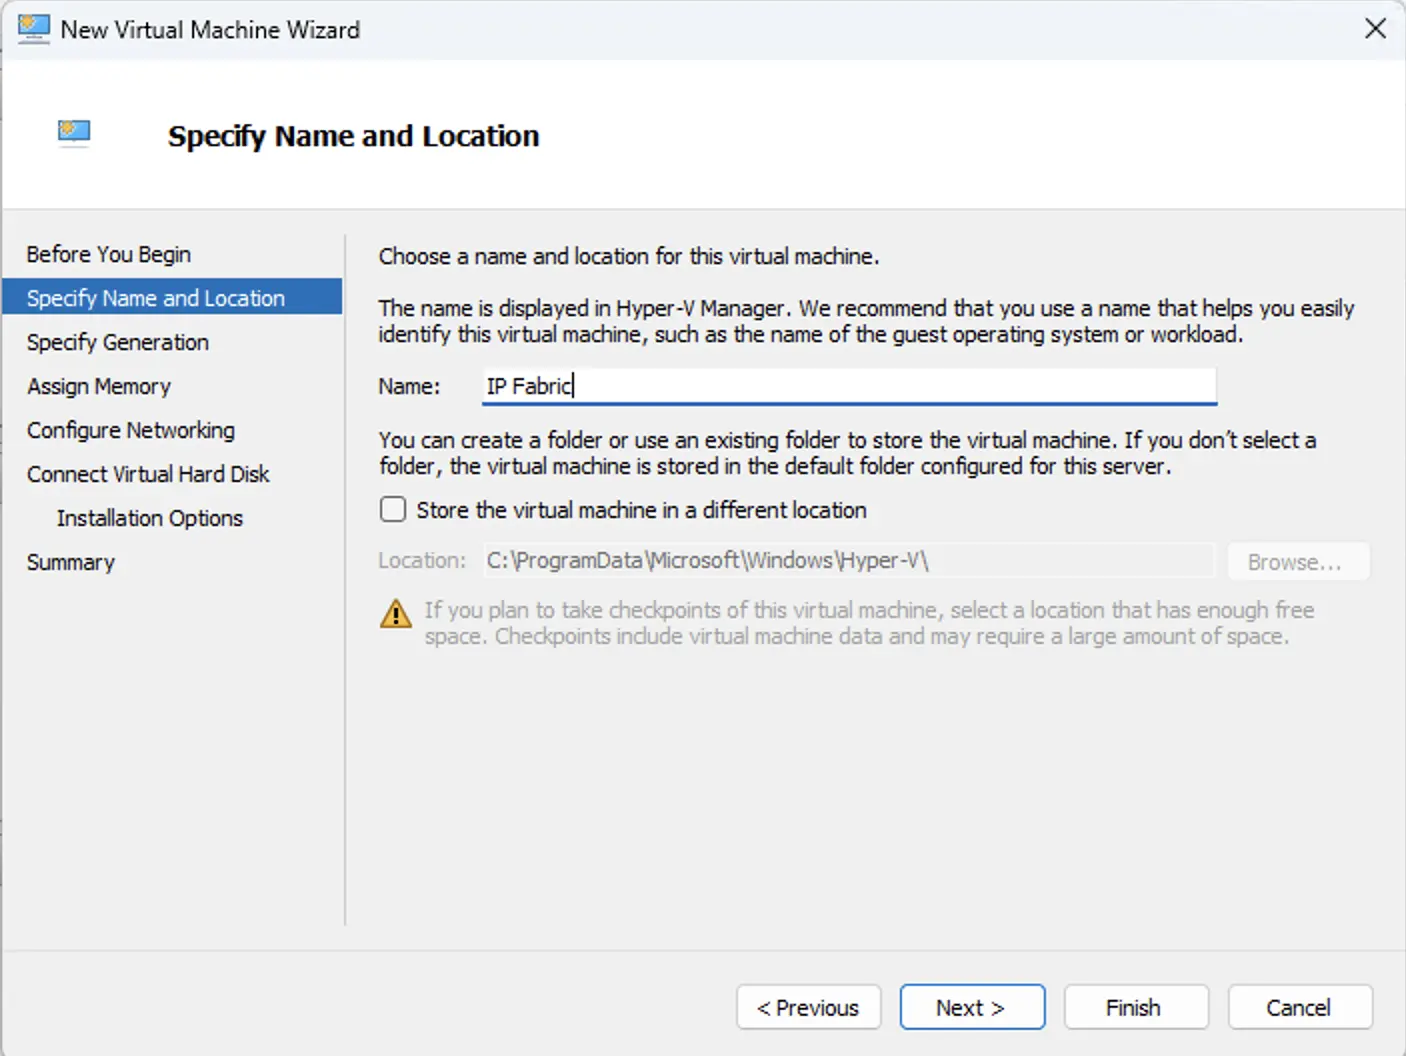
In Specify Name and Location, define the VM name.
-
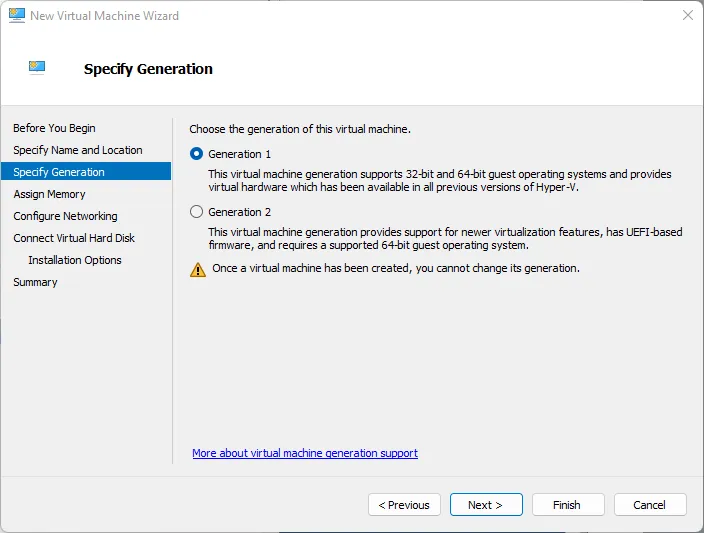
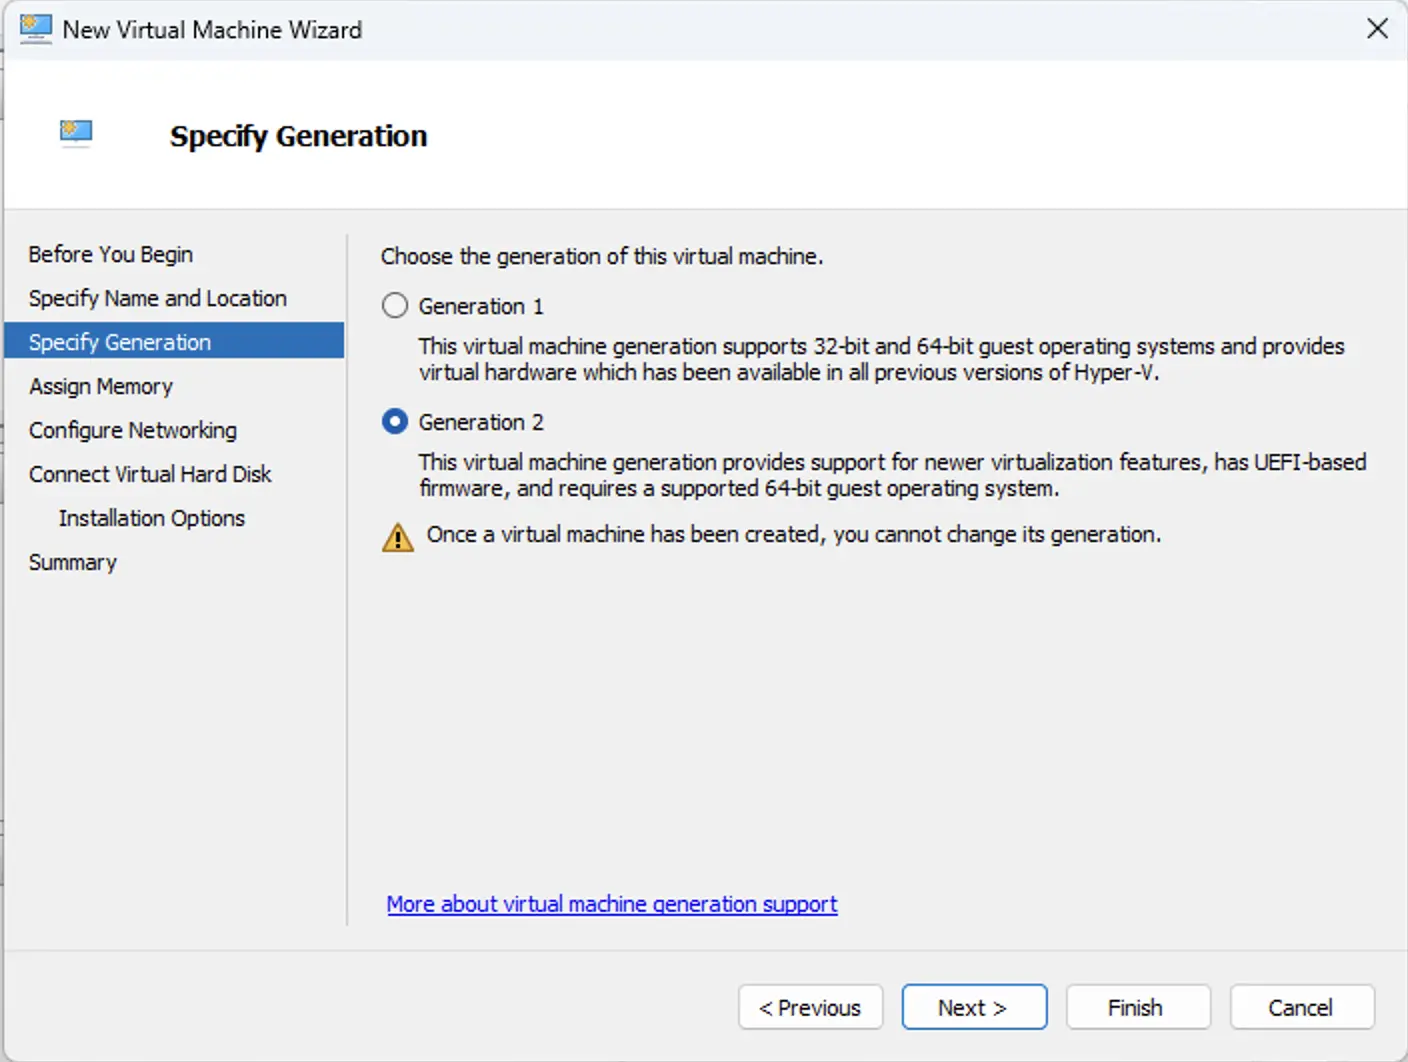
In Specify Generation, select Generation 1.
-
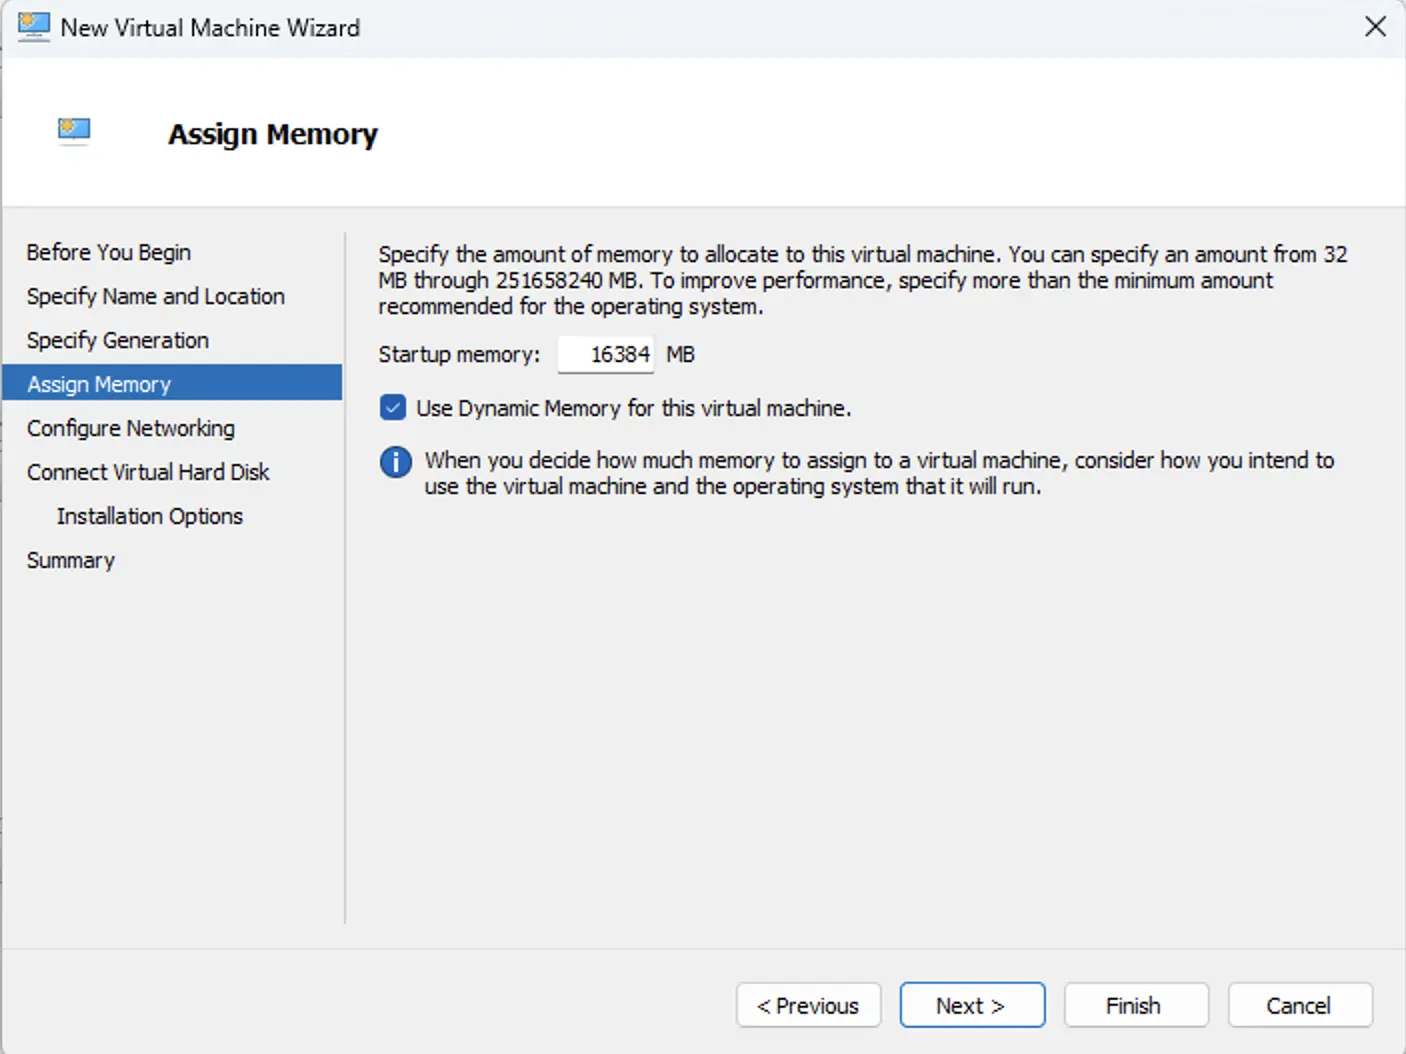
In Assign Memory:
- Configure memory according to the Hardware Requirements.
- You may use Dynamic Memory or assign fixed memory.

-
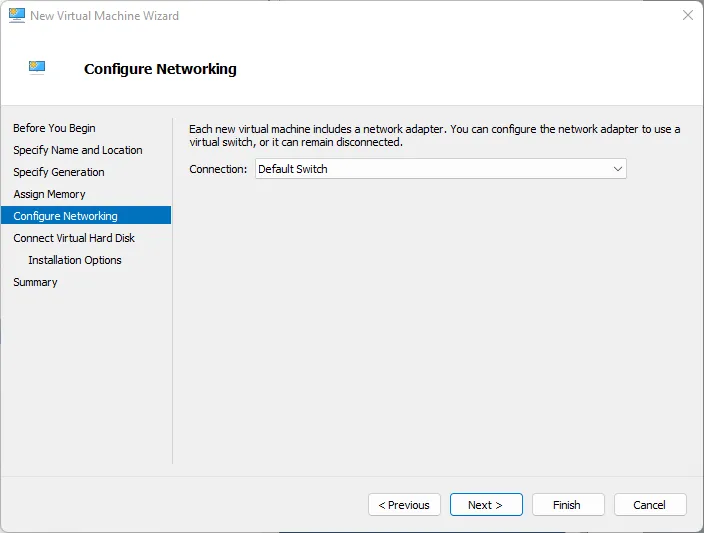
In Configure Networking, select the appropriate Virtual Switch.
-
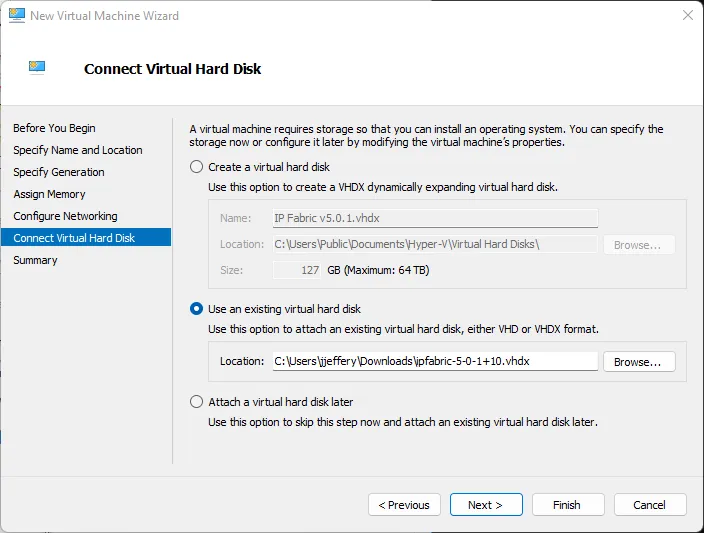
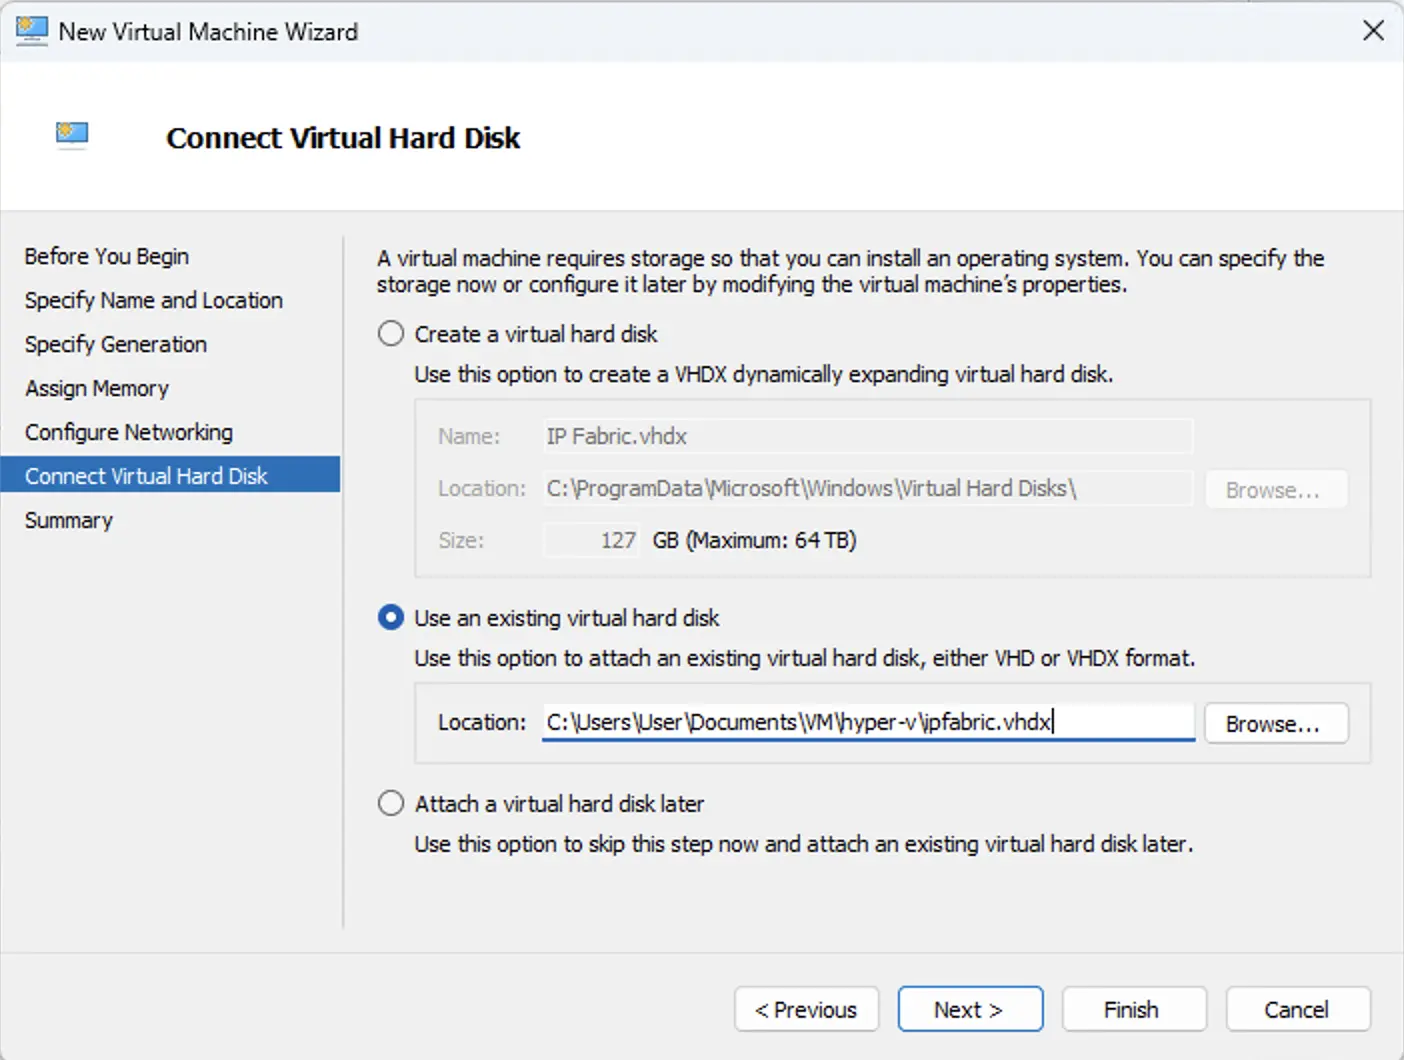
In Connect Virtual Hard Disk:
- Select Use an existing virtual hard disk.
- Choose the decompressed
ipfabric-*.vhdxfile.
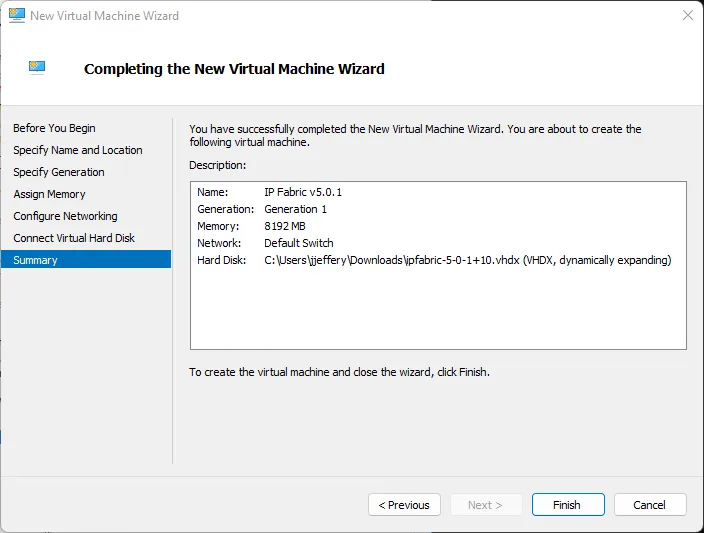
-
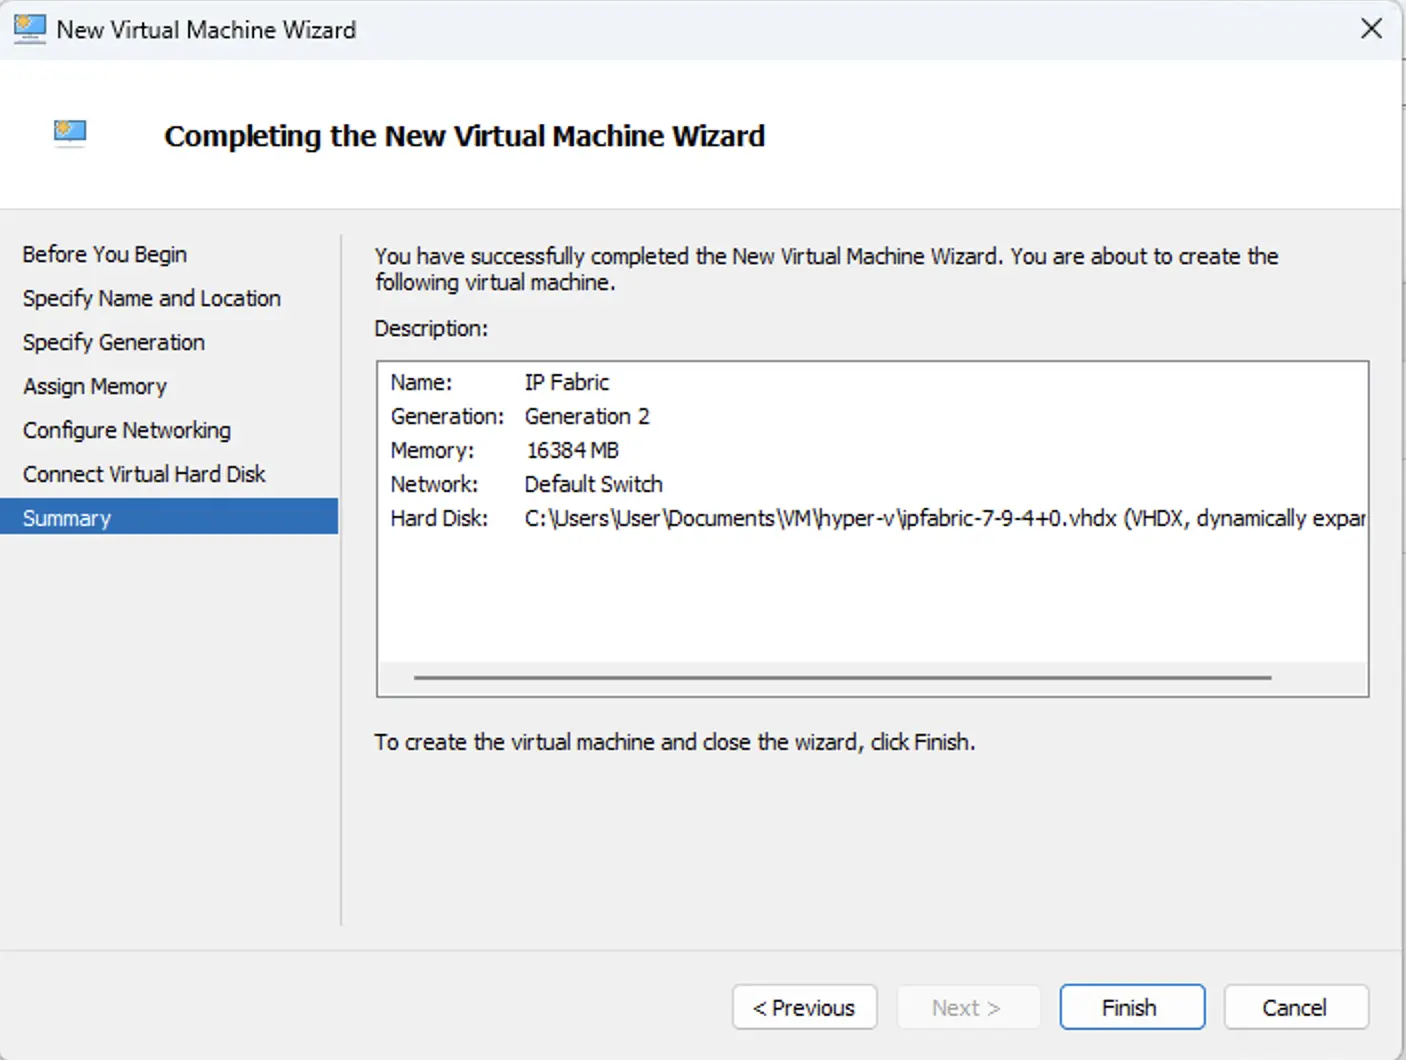
Review the Summary and click Finish.
-
After the VM is created, open Settings.
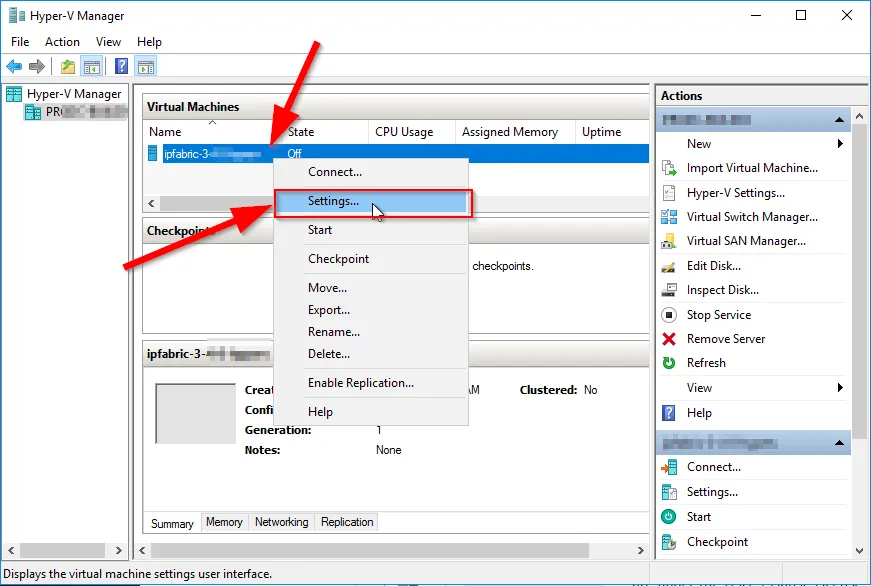
-
In Processor, configure the required number of vCPUs according to the Hardware Requirements.

-
(Optional) Increase disk capacity if required:
-
Click OK and start the VM.
Generation 2 Deployment
-
Open Hyper-V Manager and select New → Virtual Machine.
-
In Specify Name and Location, define the VM name.
-
In Specify Generation, select Generation 2.
-
In Assign Memory:
- Configure memory according to the Hardware Requirements.
- You may use Dynamic Memory or assign fixed memory.
-
In Configure Networking, select the appropriate Virtual Switch.
-
In Connect Virtual Hard Disk:
- Select Use an existing virtual hard disk.
- Choose the decompressed
ipfabric-*.vhdxfile.
-
Review the Summary and click Finish.
-
After the VM is created, open Settings.
-
In Processor, configure the required number of vCPUs according to the Hardware Requirements.
-
In Security, set Secure Boot to:
Microsoft UEFI Certificate Authority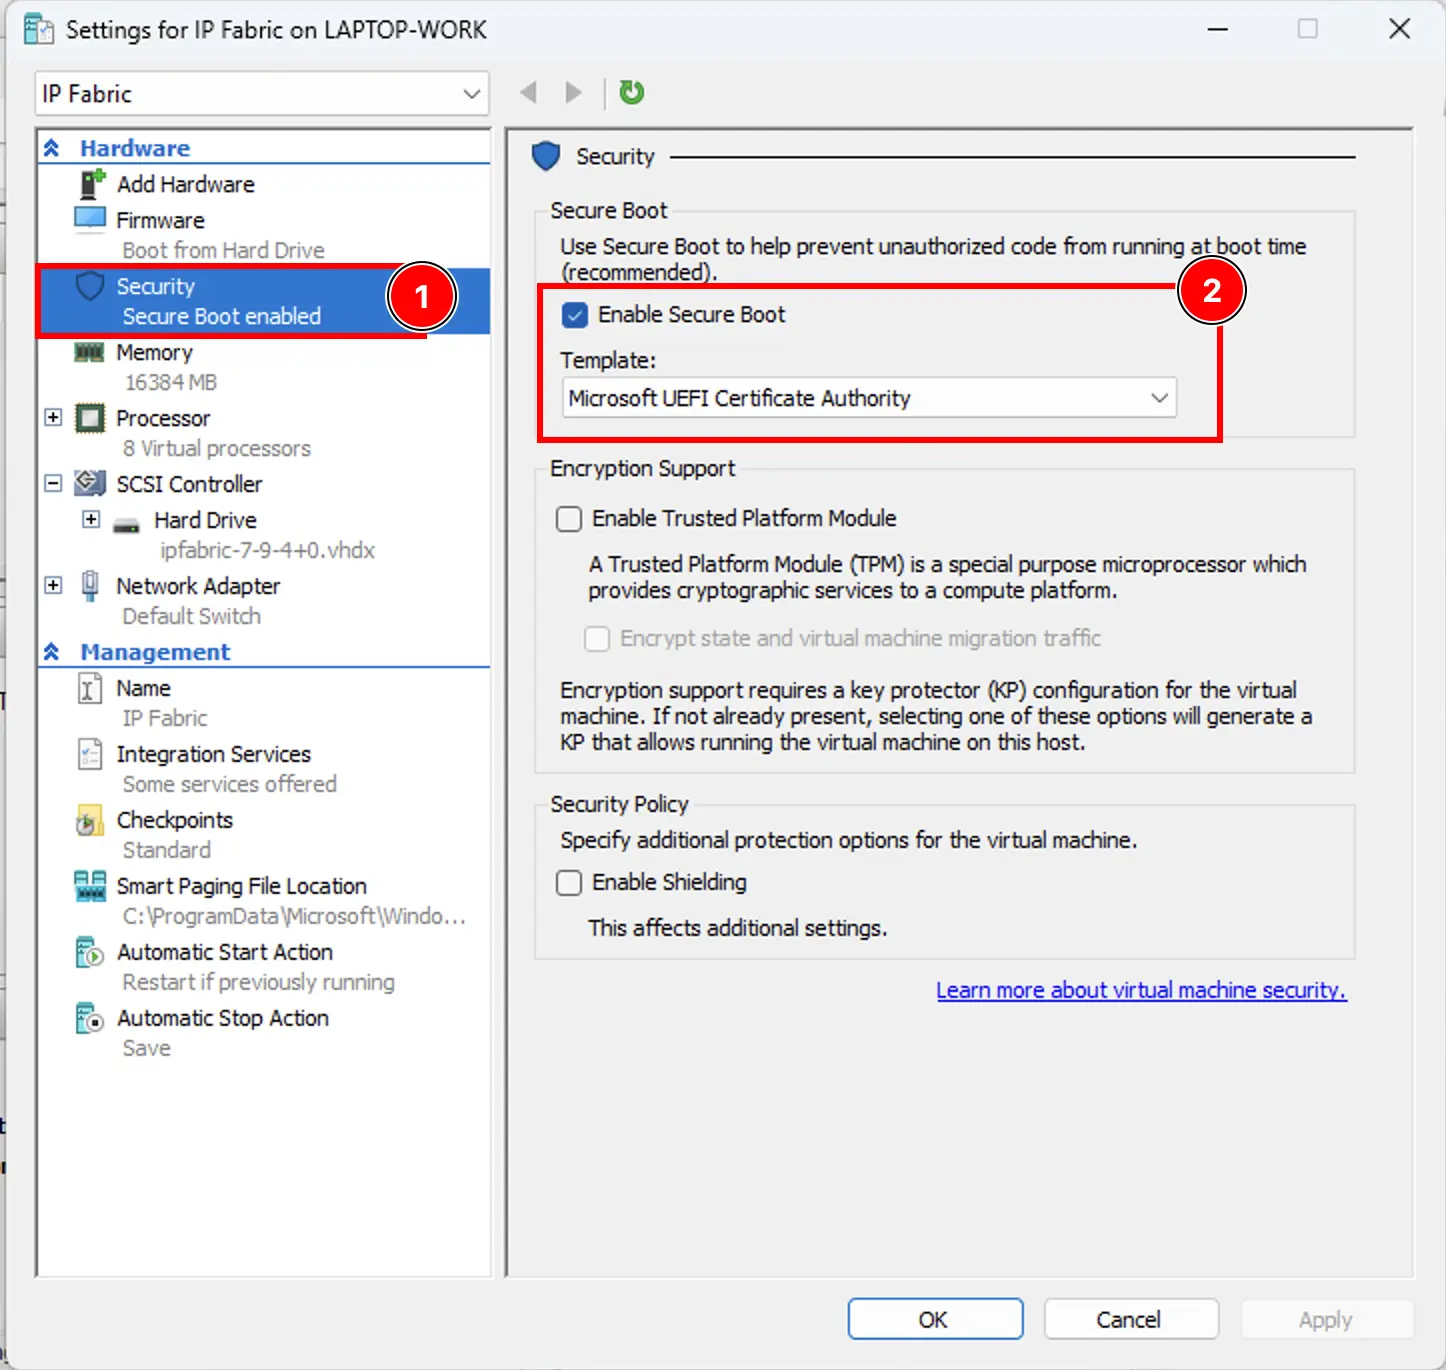
-
(Optional) Increase disk capacity if required:
-
Click OK and start the VM.
Deploying VM on Nutanix
-
Go to https://releases.ipfabric.io/images/, select the folder with the highest version number, and download the
ipfabric-<x.y.z+build>.vmdkfile. -
Import the
ipfabric-<x.y.z+build>.vmdkfile to the Nutanix hypervisor and follow Nutanix’s official documentation – Nutanix import OVA and Quick tip how to deploy a VM from OVF to AHV. -
Edit the VM hardware settings and adjust according to the network environment size. (Check requirements in the Operational Requirements section.)
- Change CPU count.
- Change memory size.
- Extend the system disk or add a new empty virtual disk if necessary.
-
Power on the VM and complete IPF CLI Config.
Deploying VM on KVM
We currently have the limitation that drives need to be /dev/sdx. Usually, Linux hypervisors use the virtio-blk driver, which is represented as /dev/vdx in the guest system. To overcome this limitation, use virtio-scsi as the drive controller.
-
Download
qcow2system disk to your KVM hypervisor. -
Resize the
qcow2data disk so it corresponds to your network’s needs if necessary. Use the following command:qemu-img resize ipfabric-disk1.qcow2 100G # (up to 1000G for 20 000 devices) -
Deploy the VM to your hypervisor with the
virt-installutility by issuing the following command (chose CPU and RAM size according to the size of your network):virt-install --name=IP_Fabric --disk path=<path to the disk>.qcow2 --graphics spice --vcpu=4 --ram=16384 --network bridge=virbr0 --import- This command deploys a new virtual machine with the name
IP_Fabric, systemqcow2disk, 4 CPU cores, 16 GB of RAM, and connects the VM to the internet through thevirtbr0interface. (If your machine has a different bridge interface name or you want to connect it to the internet directly through the device network card, you need to change the--networkparameter.) - This command also starts up the VM.
- This command deploys a new virtual machine with the name
-
Additionally, you can create and add a new empty virtual disk if needed.
Deploying VM on VirtualBox
Warning
Deploying IP Fabric on VirtualBox is currently not officially supported – it is not tested, and we cannot guarantee that it will work.
-
Download the
OVAimage. -
Import the
OVAimage via File → Import Appliance…: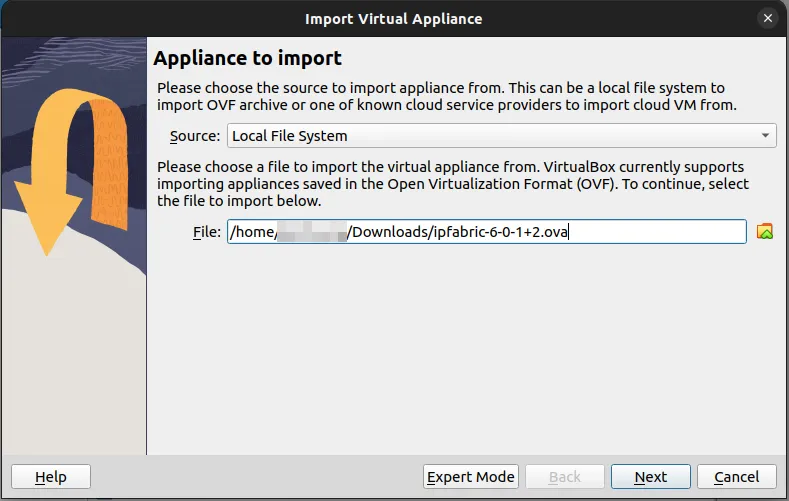
-
In the next step of the Import Virtual Appliance guide:
1. Set CPU and RAM as per the hardware requirements for your use-case.
2. Set the Network Adapter to
Paravirtualized Network (virtio-net).3. Keep the
Import hard drives as VDIoption checked for importing the disk image in the default VirtualBox format. (Otherwise, the disk image will be imported as VDMK, the default format of VMware.)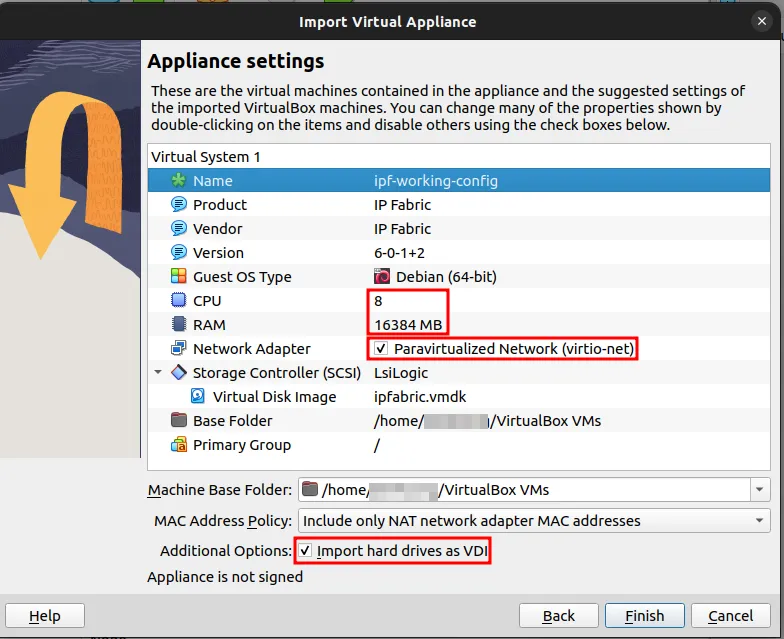
-
Right-click the newly created virtual machine and select its Settings…
-
In the System section, select
ICH9as the Chipset: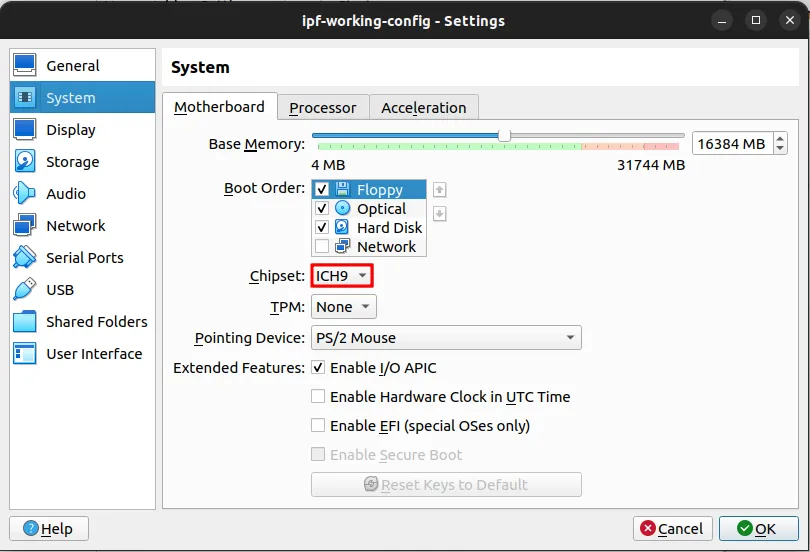
-
In the Display section, select
VMSVGAas the Graphics Controller:
- Or to what VirtualBox suggests when an invalid Graphics Controller is selected:
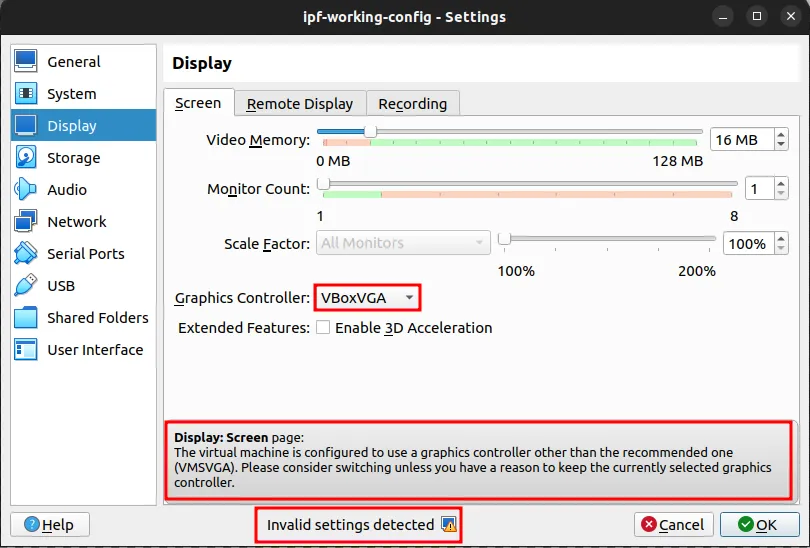
Warning
When an invalid Graphics Controller is selected, it can lead to issues in the virtual machine and even on the host machine.
-
In the Storage section, select
virtio-scsias the Controller Type: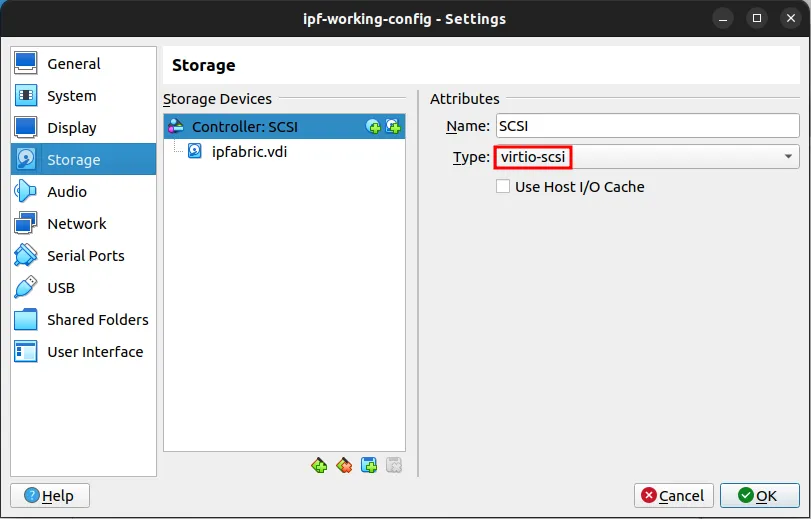
-
In the Network section, select
Bridged Adapterand re-check in Advanced that the Adapter Type isParavirtualized Network (virtio-net):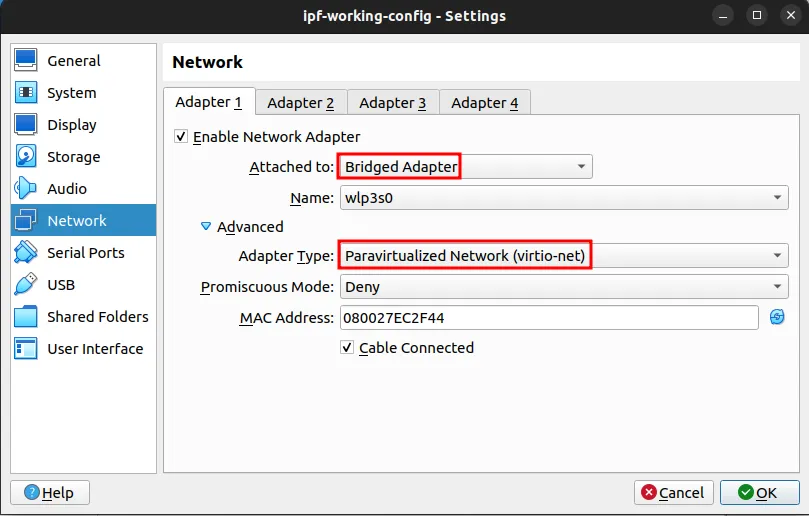
-
Start the VM.
Deploying VM on Azure
NVMe Controller
If you plan to deploy a VM with an NVMe controller (which provides increased disk performance compared to the default SCSI controller), please ensure that after creating the VM image, you also create an image definition enabled for NVMe.
Additionally, when creating the VM, in the Advanced configuration settings, enable Higher remote disk storage performance with NVMe.
Uploading IP Fabric Disk File
The first step of deploying to Azure requires creating a VHD file from the qcow2 image, uploading it to a blob storage container, and then creating an Image to use for a Virtual Machine.
-
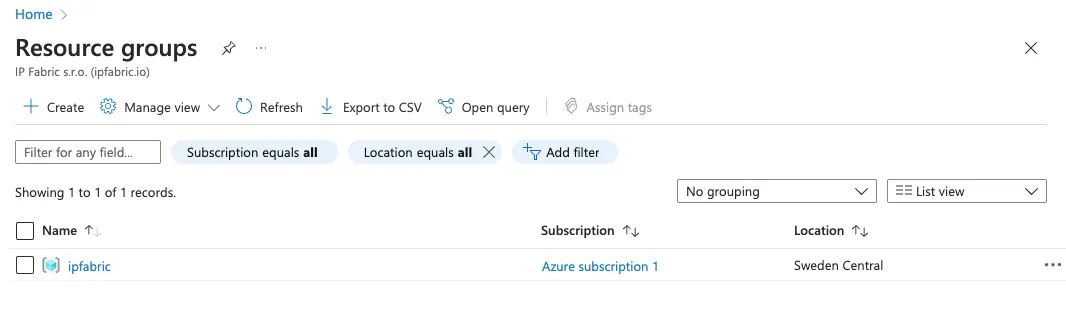
Log in to the Microsoft Azure Portal and create or use an existing Resource Group.
In the Microsoft Azure documentation, a resource group is defined as:
… a container that holds related resources for an Azure solution. The resource group can include all the resources for the solution, or only those resources that you want to manage as a group. You decide how you want to allocate resources to resource groups based on what makes the most sense for your organization. Generally, add resources that share the same lifecycle to the same resource group so you can easily deploy, update, and delete them as a group.
Please follow the instructions in Create resource groups.
-
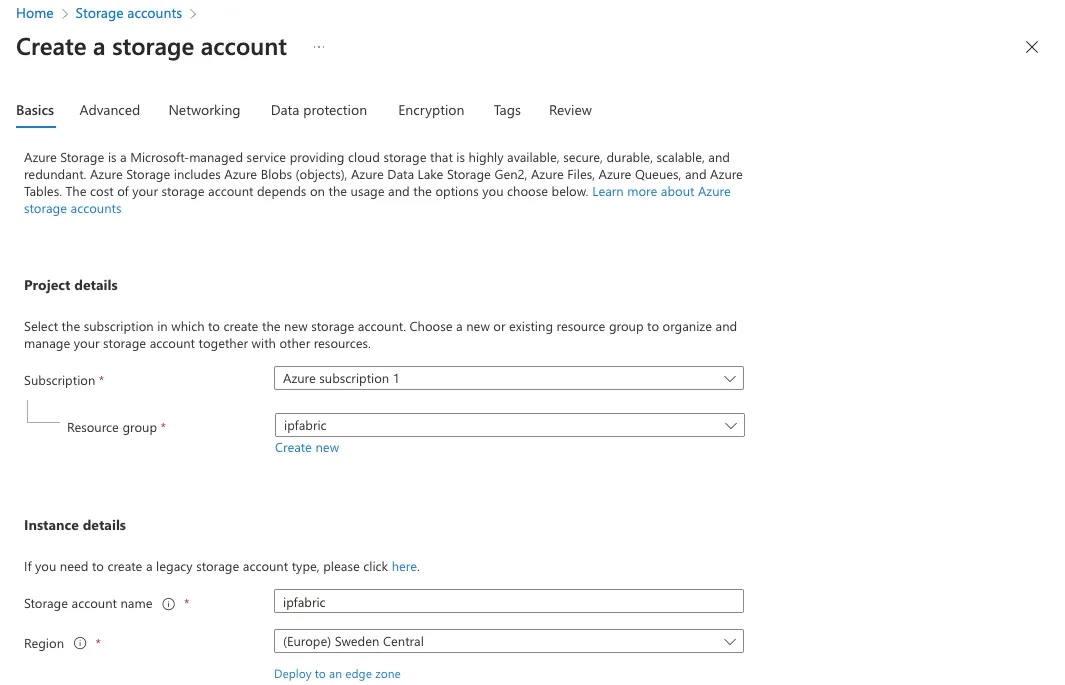
Create or use an existing Storage Account for the IP Fabric VM.
A storage account is an Azure Resource Manager resource. Resource Manager is the deployment and management service for Azure. For more information, see Azure Resource Manager overview and Creating Storage Account.
-
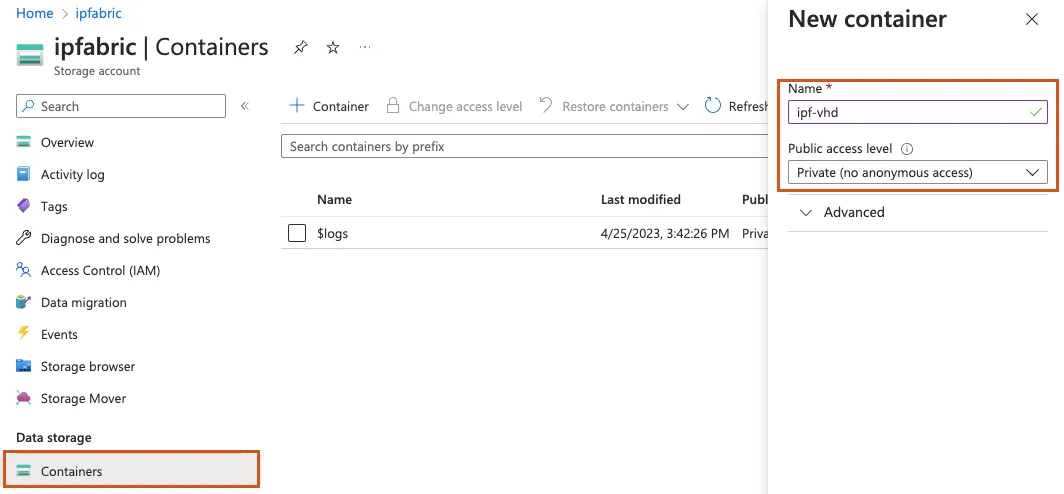
Create or use an existing Blob Storage Container.
Azure Blob Storage allows you to store large amounts of unstructured object data. You can use Blob Storage to gather or expose media, content, or application data to users. Because all blob data is stored within containers, you must create a storage container before you can begin to upload data. To learn more about Blob Storage, read the Introduction to Azure Blob Storage.
-
Convert the IP Fabric-provided
qcow2image to VHD using QEMU. The recommended way to convert the image:qemu-img convert -f qcow2 -o subformat=fixed,force_size -O vpc ipfabric-6-3-1+1.qcow2 ipfabric-6-3-1+1.vhdQEMU Version
Please use
qemu-imgversion2.6or higher. According to the Azure documentation:There is a known bug in qemu-img versions >=2.2.1 that results in an improperly formatted VHD. The issue has been fixed in QEMU 2.6. We recommend using either qemu-img 2.2.0 or lower, or 2.6 or higher.
You may check the
qemu-imgversion that you are using with:qemu-img --version -
Upload the VHD image to the storage account blob container created using the Azure Storage Explorer.
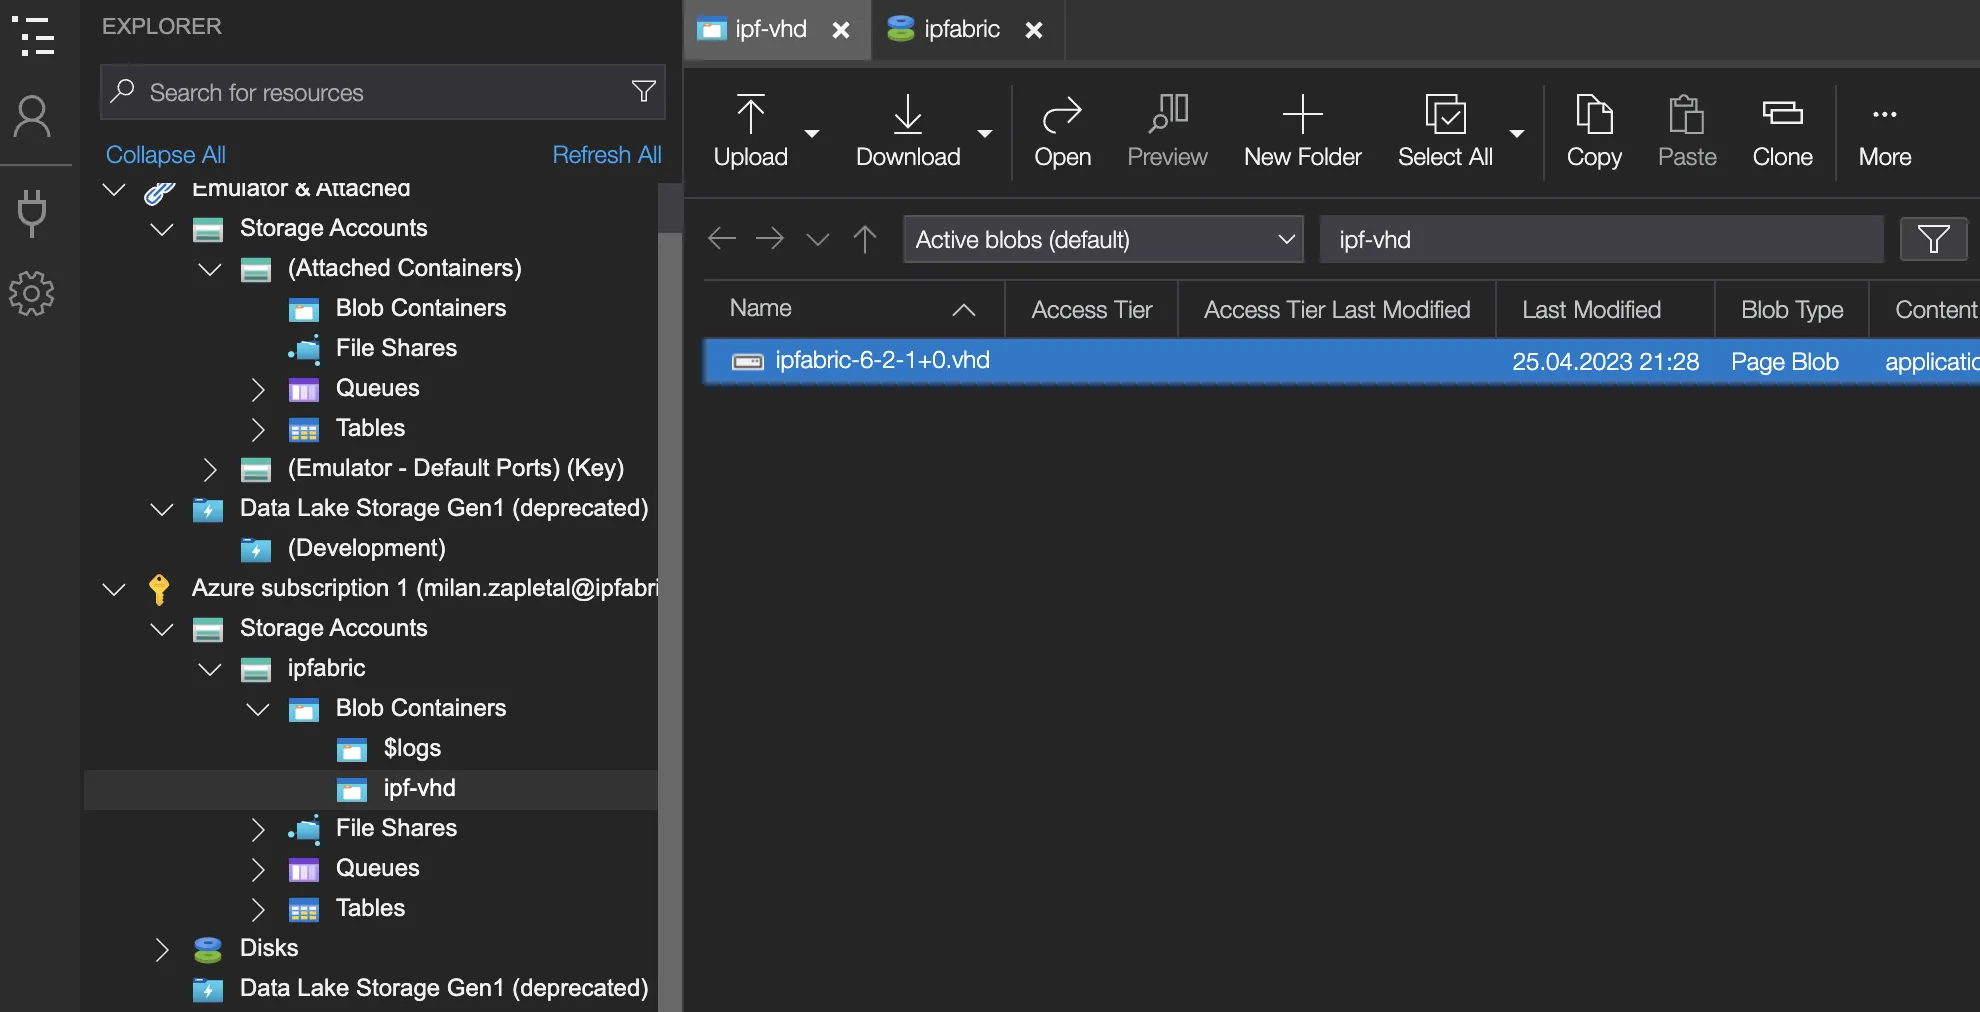
Blob Type
When uploading the VHD image to Azure, make sure to select
Page Blobas the Blob Type. Azure images can only be created from aPage Blobsource.VHD Upload
For uploading the VHD image, please use the Azure Storage Explorer (a native Windows app) instead of the Azure web UI. If you upload the VHD image via the Azure web UI, you might encounter the following error:
The specified cookie value in VHD footer indicates that disk ‘ipfabric-6-3-1+1.vhd’ with blob https://…/vhd/ipfabric-6-3-1+1.vhd is not a supported VHD. Disk is expected to have cookie value ‘conectix’.
Sizing IP Fabric VM
Prior to creating the IP Fabric image, it is necessary to know the type of server required. Azure Regions contain different server sizes, so performing this step will ensure you select the correct Region in the next step.
IP Fabric Hardware Requirements
- Check the IP Fabric Hardware Requirements documentation.
- Record the number of CPUs.
- Record the RAM requirements.
Azure VM Finder
For this example, we will use minimum of 16 CPUs and 32 GB memory requirements.
- Please visit the Azure Find your VM website.
- Select
Find VMs by workload type. - Select all for
Workload typeand clickNext. - Enter minimum and maximum CPU and RAM values.
- vCPU: min 16, max 24
- RAM: min 32 GB, max 56 GB
- Select
Premium SSDforDisk Storage. Data Diskcan be left as default as IP Fabric does not use a separate disk for data.- Under
Operating system:To use a custom VM image, select Linux and then CentOS to see VM availability and pricing information. - Select your preferred Region(s).
- Under the
Recommended Virtual Machine(s), find anInstancewith either an Intel or AMD processor that will suit your needs. - Record the
InstanceandRegionnames you would like to use for the deployment.
Creating Image
Search and select Images in the portal’s search bar, and then Create a new Image.
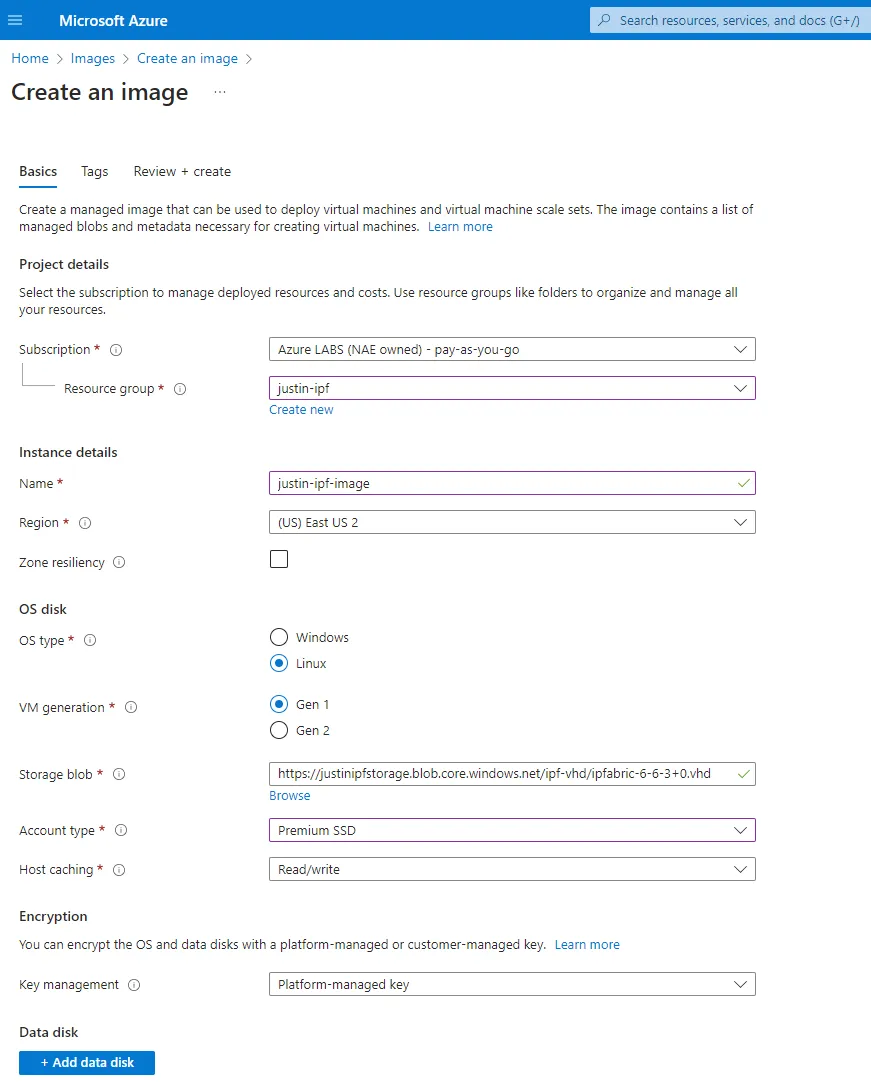
- Select the correct
SubscriptionandResource group. - Name the image.
- Select the
Regionthat was recorded from Azure VM Finder. - Set
OS typetoLinux. - Set
VM generationto eitherGen 2orGen 1as desired.Gen 2is required for NVMe. Both are supported by IP Fabric. - Browse the
Storage blobto find and select your uploaded VHD. - Set
Account typetoPremium SSD. - Set
Host CachingtoRead/write. - Set
Key managementtoPlatform-managed key. - Optional: Add custom
Tags. - Select
Review + create, wait for validation, and then clickCreate. - If you plan to deploy a VM with NVMe, follow the next step. Otherwise, skip to Creating VM.
Creating Image Definition (Only for Deployments With NVMe)
For NVMe deployments, follow these additional steps to create an image definition with NVMe support enabled.
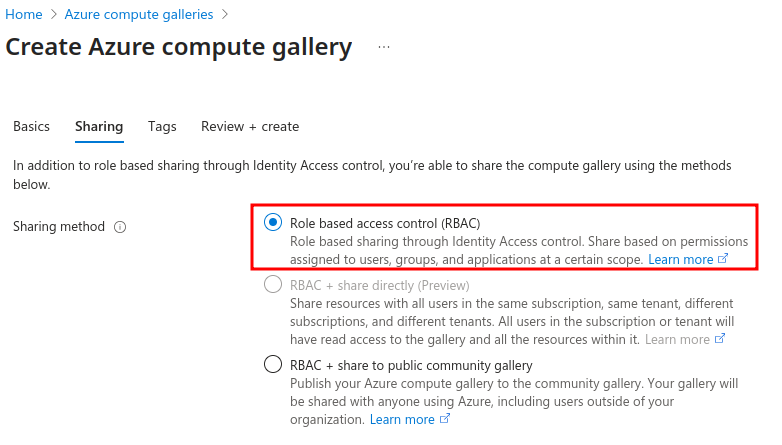
Azure Compute Gallery
The image definition will be created inside an Azure Compute Gallery. Please ensure that the gallery you choose or create for this purpose does not have public sharing enabled.
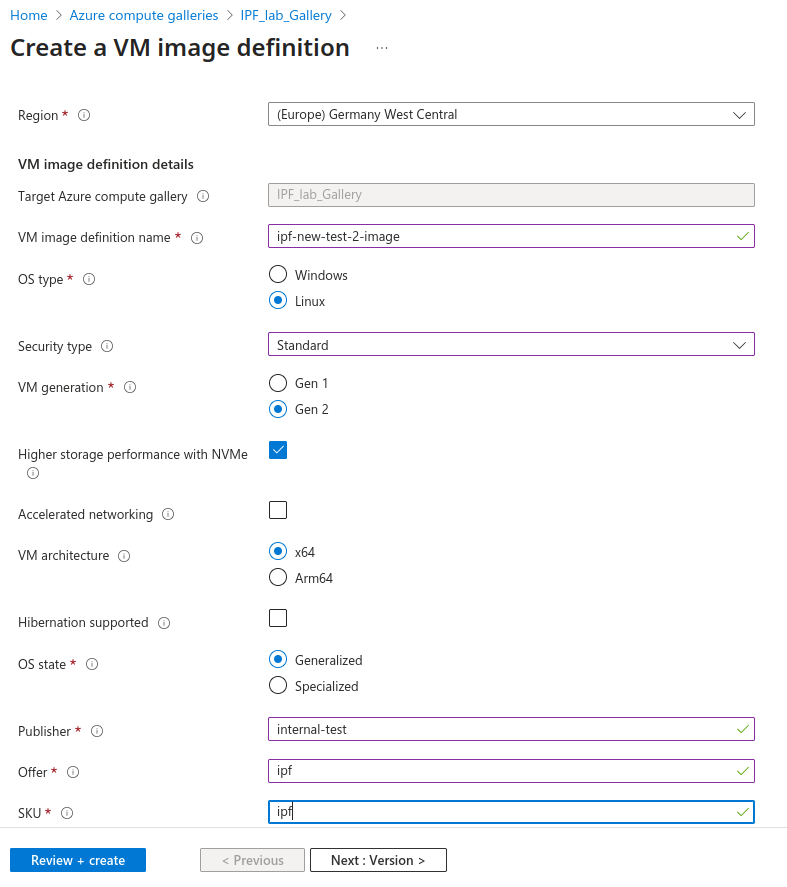
- Within the selected Azure Compute Gallery, click Add → VM image definition.
- Name the image.
- Select the
Regionthat was recorded from Azure VM Finder. - Set
OS typetoLinux. - Set
Security typetoStandard. - Set
VM generationtoGen 2. (This is required for NVMe deployments.) - Enable the
Higher storage performance with NVMeoption. - Leave the
Accelerated networkingandHibernation supportedoptions disabled. - Set
OS statetoGeneralized. - Set
Publisher/Offer/SKUvalues. - In the next page, set the
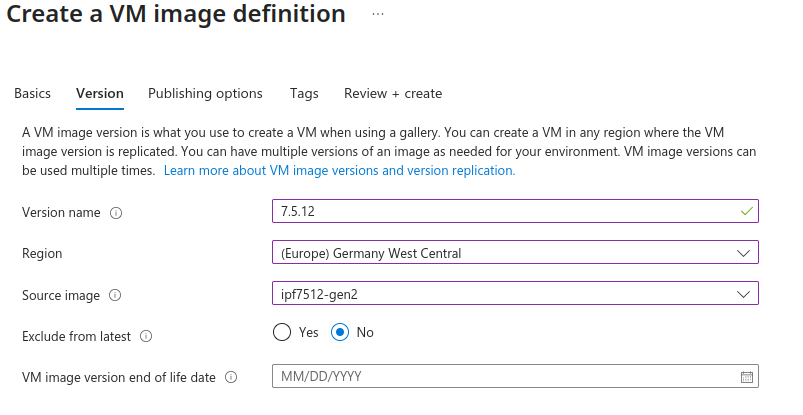
Version name, preferably to the same value as the IP Fabric version. - Select the
Regionwhere the source image exists, then select the correct source image created in the Creating Image step. - Optional: Add custom
Tags. - Select
Review + create, wait for validation, and then clickCreate.
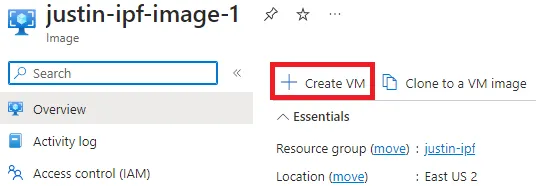
Creating VM
After creating the Image (for NVMe deployments), go to the respective resource and select Create VM:
Basics
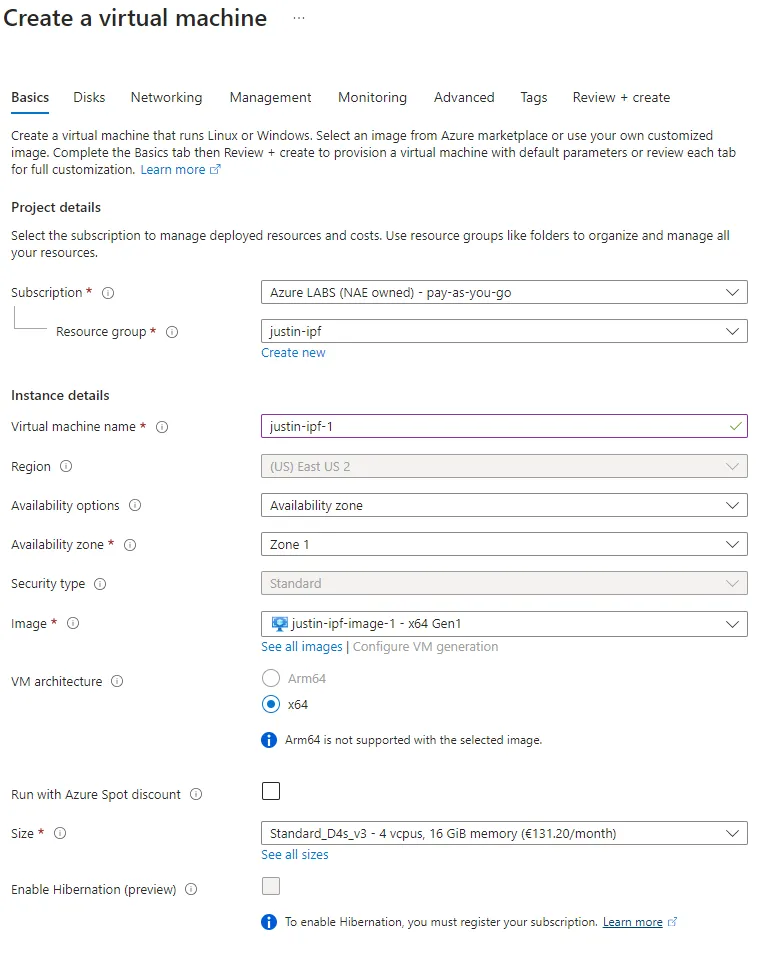
-
Fill out the required
Project detailsandInstance detailssections:-
Select the correct
SubscriptionandResource group. -
Name the virtual machine.
-
Select an
Availability Zone. -
Using the information in Sizing IP Fabric VM, select the appropriate instance size.
-
-
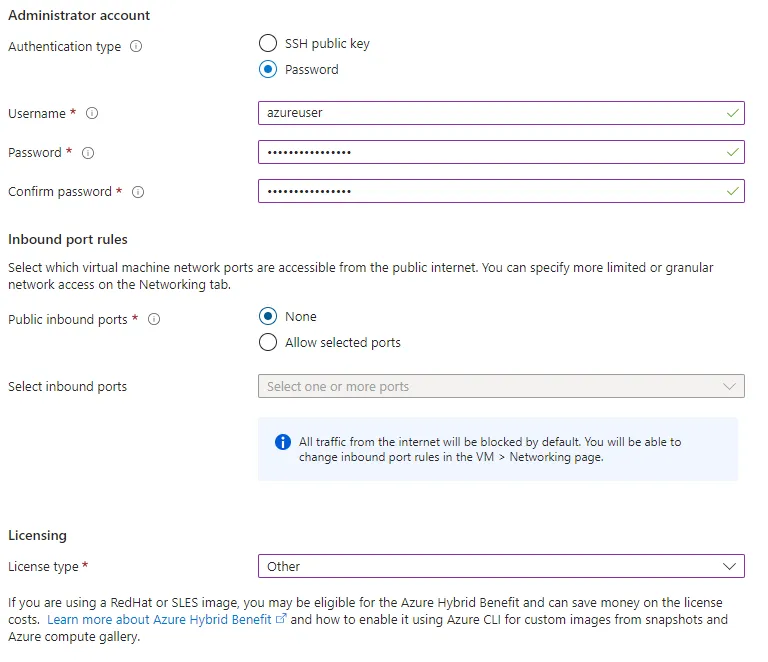
Specify an
Administrator accountusing Password authentication with a secure password.Username
Username must not be
autoboss,osadmin, orroot. Optionally, use the defaultazureuser.SSH Public Key
Specifying
SSH public keyauthentication will disable SSH Password authentication for the entire VM requiring either:- Manually editing
/etc/ssh/sshd_configto enable password authentication for theosadminuser. - Using the configured key(s) to SSH into the VM anytime CLI access is required (most secure).
- Manually editing
-
Inbound port rules > Public inbound portsshould be set toNone. -
Set
Licensing > License typetoOther.
Disks
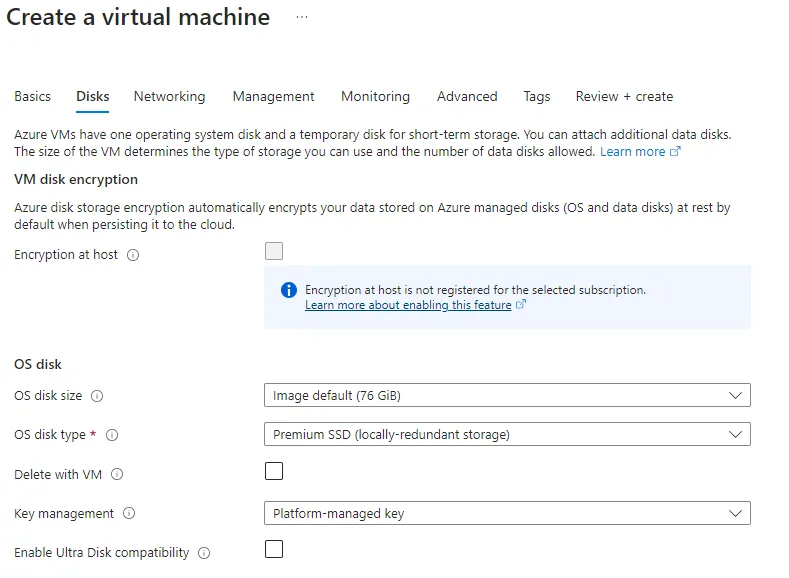
-
Enabling
Encryption at hostis recommended if it is available. -
Select the OS disk size based on resource requirements matrix.
-
OS disk type can be
Premium SSD (locally-redundant storage)orPremium SSD (zone-redundant storage).
Networking
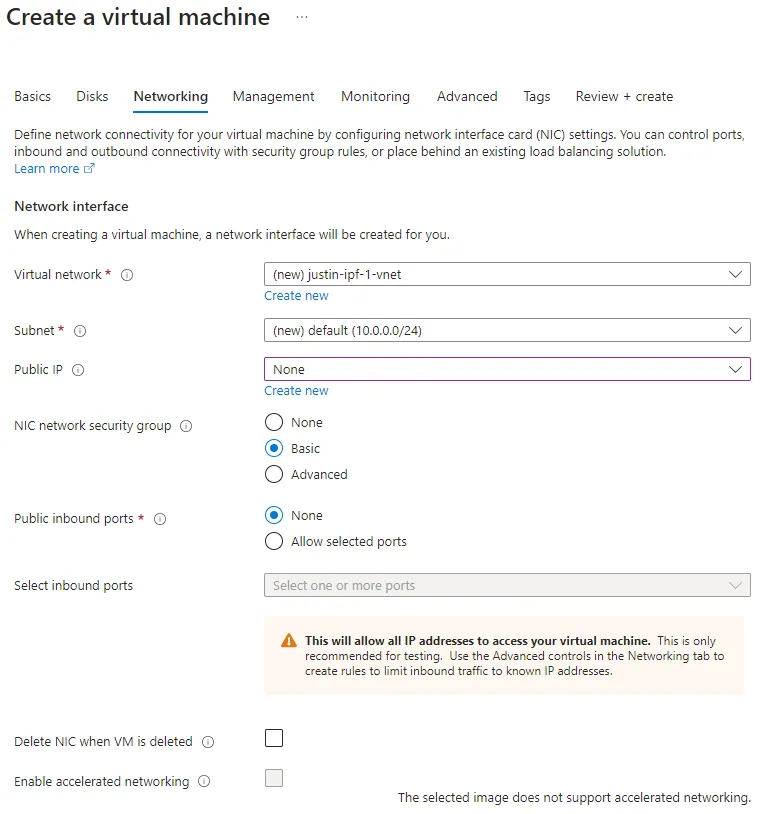
-
Select or create a new
Virtual networkandSubnet. -
Please see Network security groups for information on securing access to your VM.
Public IP
IP Fabric contains sensitive information about your network, so it is highly recommended to use private networks only.
Other Configuration Options
Management: Can be left to defaults.MonitoringandAdvanced:- For NVMe deployments: Under Advanced →
Performance (NVMe), enableHigher remote disk storage performance with NVMe. - This is outside the scope of a normal IP Fabric deployment.
- Installing
Extensionsmay impact the application, and future upgrades could remove these from the VM. - If required, please reach out to your Solution Architect to explore options.
- For NVMe deployments: Under Advanced →
Tags: Optional, assign custom tags to the resources being created.
Review + Create
Ensure validation passed and click Create.
Post Deployment
-
Connect to the IP Fabric VM via SSH with the username created during the deployment:
# password authentication: ssh azureuser@ip_address # SSH public key authentication: ssh -i identity-file.pem azureuser@ip_address -
Run IPF CLI Config:
sudo ipf-cli-config -a
Console Access
Please note that the Azure serial console might not be accessible for setting the osadmin password in IPF CLI Config.
In that case, please contact the IP Fabric Support team or your Solution Architect.
We can connect to the appliance via SSH with the default/factory osadmin password (that is overwritten during IPF CLI Config) and run IPF CLI Config manually.