IPF Certificates
You are accessing the IP Fabric GUI using a secure TLS connection. A self-signed
server certificate is automatically generated during the IP Fabric deployment.
However, due to the nature of SSL/TLS, the self-signed server certificate cannot be
trusted – as indicated in an SSL/TLS error in the web browser (for example,
NET::ERR_CERT_AUTHORITY_INVALID in Google Chrome).
We recommend that you replace the self-signed server certificate with your own server certificate signed by a trusted certificate authority.
Enabling SSO while using a Private Certificate Authority (CA)
If your organization uses an internal CA and you plan to enable SSO, additional steps are required after completing the instructions on this page. Specifically, you must add your CA certificate to the system’s trust store to ensure SSO functions correctly. For detailed guidance, refer to Certificate Authorities.
Usually, the server certificate replacement can be handled via Settings → System → IPF Certificates and consists of the following steps:
- Generate a CSR (Certificate Signing Request).
- Sign the generated CSR with a trusted certificate authority.
- Upload the signed server certificate.
Important
Only a certificate that is the result of signing a CSR generated with Settings → System → IPF Certificates → Generate can be uploaded to IP Fabric with Settings → System → IPF Certificates → Upload and used as IP Fabric’s server certificate.
In the Miscellaneous section, we also describe how to handle some special requirements regarding certificates – when Settings → System → IPF Certificates on its own is not sufficient.
Generate CSR (Certificate Signing Request)
Subject Alternative Name
Short Subject Alternative Names (only hostnames without a domain name) are not accepted by all CAs (Certificate Authorities). To remove it from the CSR, switch off the Include DNS short name in CSR SAN toggle.
Only Some Characters Are Allowed in Fields
The fields Organization name, Department, City, and
State / Province must match the following regular expression:
/^[A-Za-z0-9.,\/_@%^:=+ -]*$/
- They must contain only these characters:
A-Za-z0-9.,/_@%^:=+ -
This is for security reasons.
If this is too restrictive, please follow the instructions in Generate CSR with Special Characters.
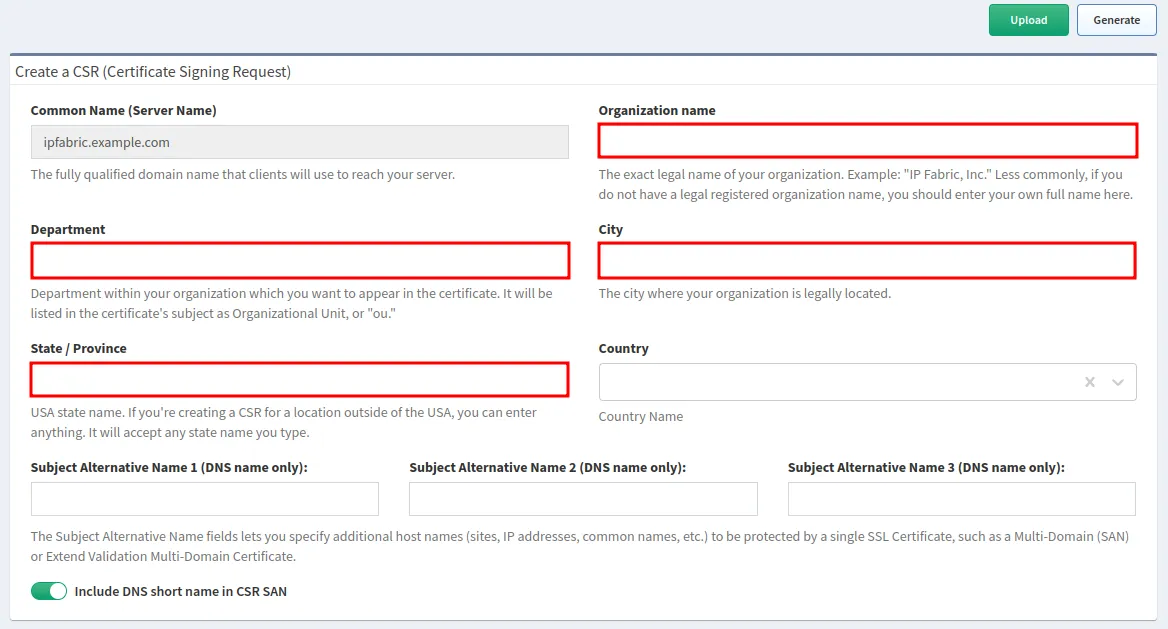
- Go to Settings → System → IPF Certificates.
- Fill out the Create a CSR (Certificate Signing Request) form.
- Click Generate (in the top-right corner).
- A file called
nimpee.csrwill be downloaded.
Sign Generated CSR
This step depends on the vendor and version of your certificate authority. Therefore, please check the vendor’s documentation.
Upload Signed Server Certificate
Warning
Only PEM (Base64-encoded) certificate format is supported.
Warning
Only a certificate that was created by signing the most recent CSR can be uploaded to IP Fabric! If you generate another CSR before uploading the certificate created from the previously generated CSR, the certificate will not be applied.
Important
If you are signing a certificate by a certificate authority that also has intermediate certificates, the whole certificate chain needs to be included in the final certificate uploaded to IP Fabric in one continuous file:
-----BEGIN CERTIFICATE-----
(Base64 server certificate)
-----END CERTIFICATE-----
-----BEGIN CERTIFICATE-----
(Base64 intermediate certificate)
-----END CERTIFICATE-----
-----BEGIN CERTIFICATE-----
(Base64 root certificate)
-----END CERTIFICATE-----
- Go to Settings → System → IPF Certificates.
- Click Upload (in the top-right corner).
- Drag and drop the new certificate or use Select file to upload it.
- While the new certificate is being installed, the IP Fabric GUI may be unresponsive for a few seconds.
- Refresh the IP Fabric GUI in your browser.
Miscellaneous
Generate CSR With Special Characters
Let’s consider an example where we enter Test Company with & (please note that
the character & is not allowed) as the Organization name. After filling in
the remaining fields, when we click Generate, an Invalid Input error will
be displayed.
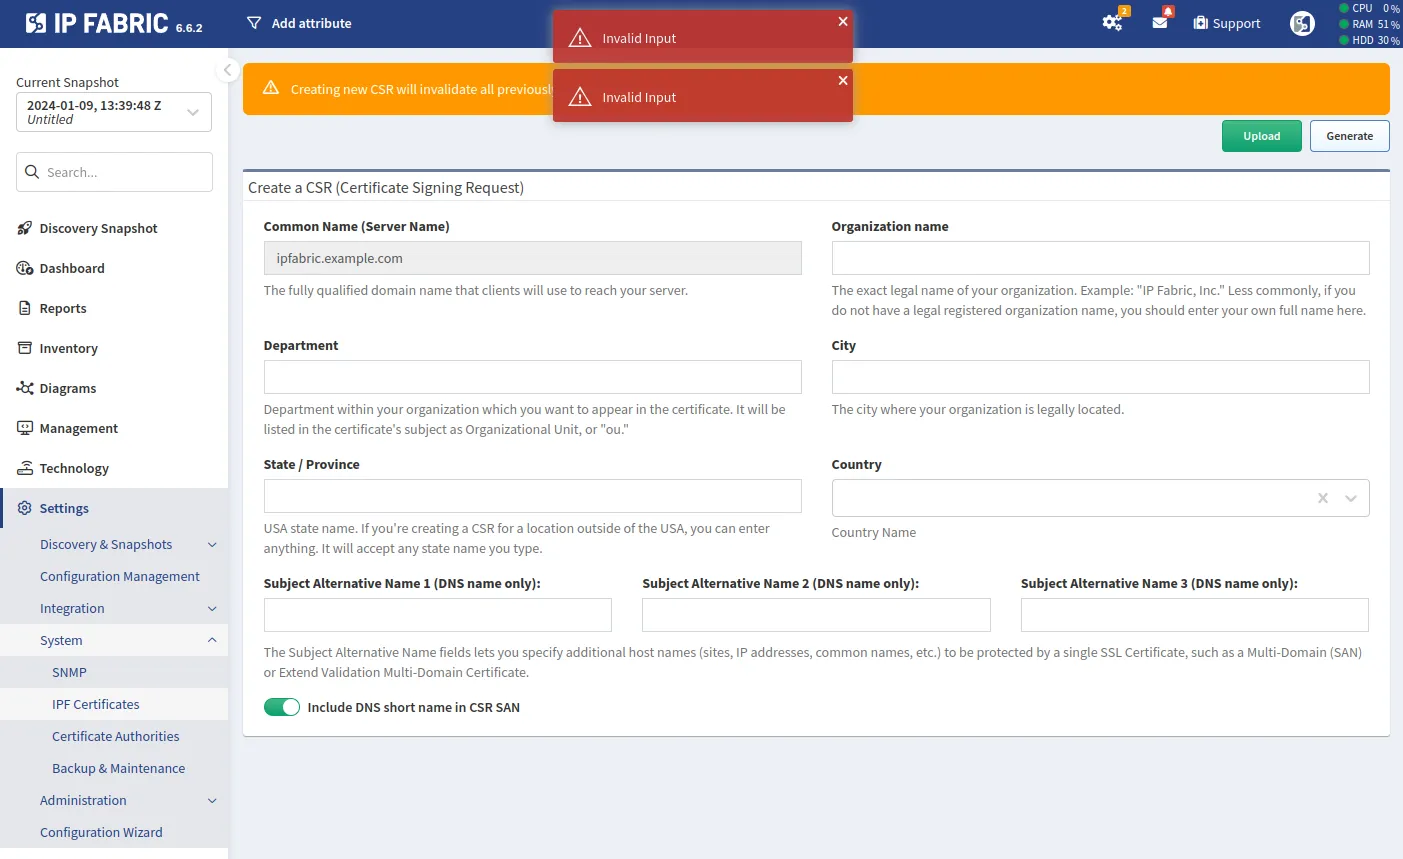
If any special characters are required in any of the mentioned fields, follow these steps:
-
Fill out the Create a CSR (Certificate Signing Request) form, but avoid any special characters (in our example, we replaced
Test Company with &withTest Company with):
-
Click Generate.
- In your browser, a file called
nimpee.csrwill be downloaded. Please do not use this file. - The files
customer.conf,customer.key, andcustomer.csrwill be generated in the directory/opt/nimpee/conf.d/ssl-custon the IP Fabric appliance. It’s important to note thatcustomer.csrwill be identical tonimpee.csr.
- In your browser, a file called
-
Log in to the IP Fabric CLI as the
osadminuser. -
Change to
root:sudo su -
Change to the
/opt/nimpee/conf.d/ssl-custdirectory:cd /opt/nimpee/conf.d/ssl-cust -
Remove
customer.keyandcustomer.csr(they will be re-generated in step 8):rm customer.key customer.csr -
Modify
customer.conf(for example withvi customer.conf; in our example, we changedTest Company withtoTest Company with &):
-
Generate new
customer.keyandcustomer.csrfiles using the modifiedcustomer.conf:openssl req -new -config customer.conf -keyout customer.key -out customer.csr -
Check the new
customer.csr:openssl req -in customer.csr -noout -text -
Change the owner and group of the two new files to
autoboss:chown autoboss:autoboss customer.csr customer.key -
Download the new
customer.csr(for example withscp) for signing.
Once you have the signed certificate ready, navigate to Settings → System → IPF Certificates and click Upload to begin the process of uploading the certificate.
Additionally Add Entire Certificate Chain
A new, unmodified certificate file might contain only the server certificate itself without the certificate chain (intermediate and root certificates).
This might be sufficient for your browser (as it most probably already has the corresponding intermediate and root certificates), but not for SSO.
SSO requires the certificate to have the entire certificate chain (including the intermediate and root certificates).
After uploading such a certificate via Settings → System → IPF Certificates → Upload, you will encounter the following error while logging in to IP Fabric via SSO:
{"code":"API_AUTHENTICATION_FAILURE","message":"Authentication Failure","errors":[{"message":"Error: unable to verify the first certificate"}]}
Tip
Alternatively, you may append the intermediate and root certificates to the certificate file before uploading it via Settings → System → IPF Certificates → Upload – as described above in Upload Signed Server Certificate.
To ensure that the certificate on the IP Fabric appliance has the entire certificate chain, do the following:
-
Log in to the IP Fabric CLI as the
osadminuser. -
Change to
root:sudo su -
Change to the
/etc/nginx/ssldirectory:cd /etc/nginx/ssl -
Verify that the
server.crtfile indeed has only the server certificate itself:grep 'CERTIFICATE' server.crt- The command should return only one pair of
-----BEGIN CERTIFICATE-----and-----END CERTIFICATE-----.
- The command should return only one pair of
-
Make a backup of
server.crt:cp server.crt server.crt.bkp -
Append the immediate and root certificates to
server.crt:vi server.crtIn case you do not have the immediate and root certificates readily available:
-
Open the IP Fabric GUI in your browser.
-
Click the Lock icon in the browser’s address bar and download the entire certificate chain:
Google Chrome: Connection is secure → Certificate is valid → Details → Export… → Base64-encoded ASCII, certificate chain
Mozilla Firefox: Connection is secure → More information → View Certificate → Download → PEM (chain)
-
Go to the IP Fabric CLI.
-
Clear the content of
server.crt:echo '' > server.crt -
Copy the content of the entire certificate chain and paste it into
server.crt:vi server.crt
-
-
Verify that the MD5 hashes of
server.crtandserver.keyare identical:Example
root@ipfabric:/etc/nginx/ssl# openssl x509 -noout -modulus -in server.crt | openssl md5
(stdin)= 9dcfd46578b9dffe06ca0146607f6153
root@ipfabric:/etc/nginx/ssl# openssl rsa -noout -modulus -in server.key | openssl md5
(stdin)= 9dcfd46578b9dffe06ca0146607f6153
Danger
Do not proceed with the next step if the MD5 hashes do not match!
-
Restart the
nginxweb server:systemctl restart nginx -
Check if the
nginxweb server is running:systemctl status nginx -
Try to log in to IP Fabric via SSO again.
Add Custom SSL Certificate
If you require a custom SSL certificate (prepared completely outside IP Fabric) and cannot use Settings → System → IPF Certificates, follow this guide to replace the self-signed certificate manually.
Important
Please ensure that the FQDN (DNS name) of the IP Fabric appliance is set as
your custom certificate’s Subject Alternative Name. Having the FQDN as the
certificate’s Subject or Common Name is not sufficient.
-
Log in to the IP Fabric CLI as the
osadminuser. -
Change to
root:sudo su -
Change to the
/etc/nginx/ssldirectory:cd /etc/nginx/ssl -
Backup the previous server certificate and its private key:
mv server.crt server.crt.bkp mv server.key server.key.bkp -
Upload the new certificate chain and private key to the
/etc/nginx/ssl/directory.- They must have the same names as those previous ones –
server.crtandserver.key. server.crtneeds to contain the new SSL certificate and full certificate chain in PEM format.server.keyneeds to contain the new SSL certificate’s private key in decrypted PEM format.
- They must have the same names as those previous ones –
-
The certificate chain in
server.crtmust have the following sequence:- server certificate
- intermediate certificate(s)
- root certificate
-
Make sure that the new
server.crthas the same owner and group (root:root) and permissions (-rw-r--r--) as the old one:chown root:root server.crt chmod 0644 server.crt -
Make sure that the new
server.keyhas the same owner and group (root:autoboss) and permissions (-rw-r-----) as the old one:chown root:autoboss server.key chmod 0640 server.key -
Verify that the MD5 hashes for
server.crtandserver.keyare identical:Example
root@ipfabric:/etc/nginx/ssl# openssl x509 -noout -modulus -in server.crt | openssl md5
(stdin)= 9dcfd46578b9dffe06ca0146607f6153
root@ipfabric:/etc/nginx/ssl# openssl rsa -noout -modulus -in server.key | openssl md5
(stdin)= 9dcfd46578b9dffe06ca0146607f6153
Danger
Do not proceed with the next step if the MD5 hashes do not match!
If the MD5 hashes do not match, check if the certificate chain is in the correct order and if the private key corresponds to the server certificate.
-
Restart the
nginxweb server:systemctl restart nginx -
Check if the
nginxweb server is running:systemctl status nginx -
Verify that the new certificate works correctly by visiting the IP Fabric main GUI in your browser.