Label-Based Access Control
Experimental Feature
Label-based access control is an experimental feature introduced in 8.2.
It is part of Labels and is
disabled by default. To enable it, set the ENABLE_LABELS feature flag. See
Feature Flags
for details.
Since 8.2, you can restrict which devices and interfaces a role can see, based
on the labels assigned to them. For
example, a role for the London operations team can be limited to devices
labeled ipf_site:LON.
Label-based access control extends Role-Based Access Control (RBAC) with three building blocks:
- Enrolled labels – Labels you explicitly allow to be used for access control.
- Data policies – Conditions on enrolled labels that decide which rows a role may see.
- Endpoint policies – Sets of API endpoints a role may call.
A role combines endpoint policies (which API endpoints may be called) and data policies (which rows may be seen). Roles are then assigned to users and API tokens.
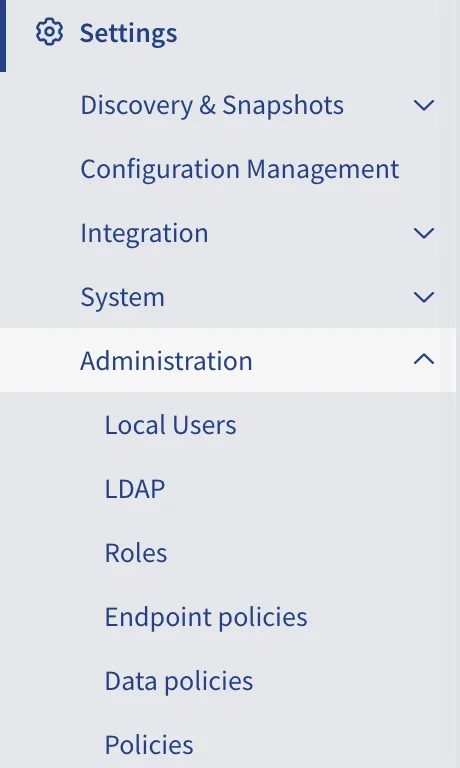
With ENABLE_LABELS enabled, Settings → Administration contains two new
pages, Endpoint policies and Data policies, and the Roles page lets
you link both kinds of policies to a role.
How Access Is Evaluated
- Data policies restrict devices and interfaces. A device or interface is visible to a restricted user only if at least one of the user’s data policies admits it. Devices and interfaces that no policy admits – including those without labels – are hidden.
- Devices and interfaces are evaluated separately. A device admitted by a policy does not make its interfaces visible – interfaces must carry the labels themselves, for example through inheritance.
- The restriction applies to table rows built from devices or interfaces – the inventory tables and most technology tables – in both the GUI and the API. Diagrams and other views are not filtered.
- When a user has several roles, or a role has several data policies, the user sees everything admitted by any of the policies (union).
- A user is not restricted at all when: - any of the user’s roles is an administrator role, - any of the user’s roles has no data policy, or - the user has no roles (such a user has no access to API endpoints either).
Roles Without Data Policies Grant Full Access
A single role without a data policy gives the user unrestricted access, regardless of the user’s other roles. To restrict a user, make sure that every role assigned to the user has at least one data policy.
Built-in roles, such as ipf-gui and ipf-checker, cannot have data
policies, so they always grant unrestricted access. New local users get the
ipf-gui role by default. To restrict a user, remove every built-in role
from the user and assign only custom roles with data policies. To keep GUI
access, add the ipf-gui endpoint policy to the custom role instead.
API tokens are evaluated by the roles assigned to the token, not the roles of the user who created it. A token created by an administrator is restricted if all of its roles have data policies.
Access is recalculated immediately when you change a data policy or label assignments, and after every discovery.
Step 1: Enrol Labels for RBAC
A label must be enrolled before a data policy can use it. All labels start un-enrolled, so enrolling a label never changes access by itself.
- Go to Settings → Administration → Data policies and click Manage enrolled labels.
- Turn on the switch next to each label you want to use in data policies. The badge next to each label shows how many objects carry it in the selected snapshot.
- Click Save.
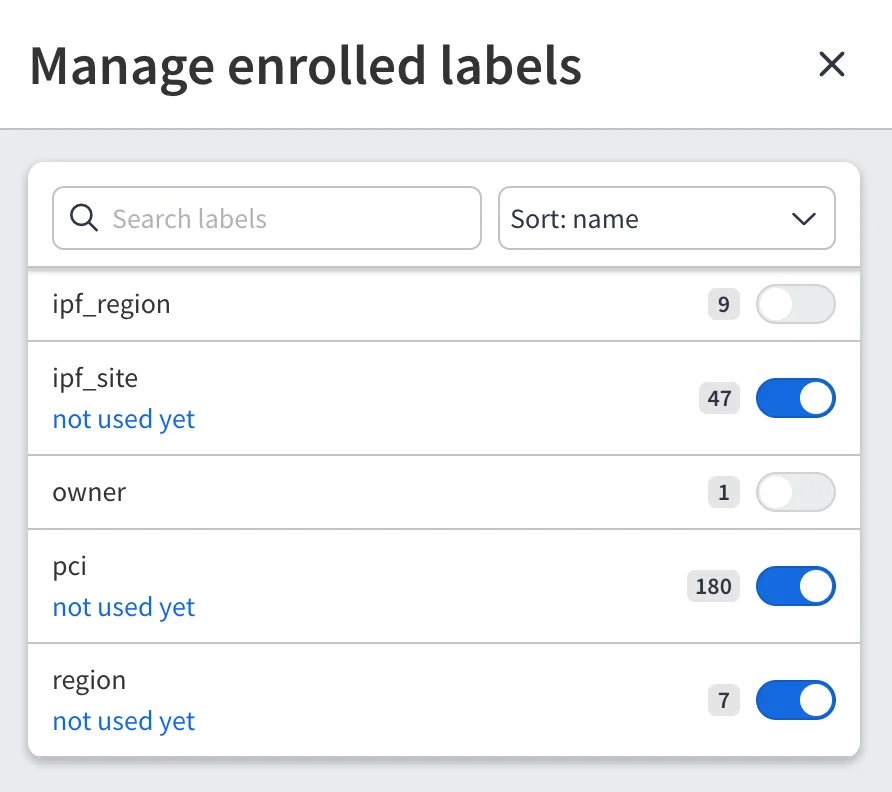
A snapshot must be selected to manage enrolled labels.
A label used by a data policy cannot be un-enrolled. Its switch is locked with the tooltip:
Used by data policies. Remove it from those policies before un-enrolling.
The label also shows the policies that use it – for example, Used in: London PCI.
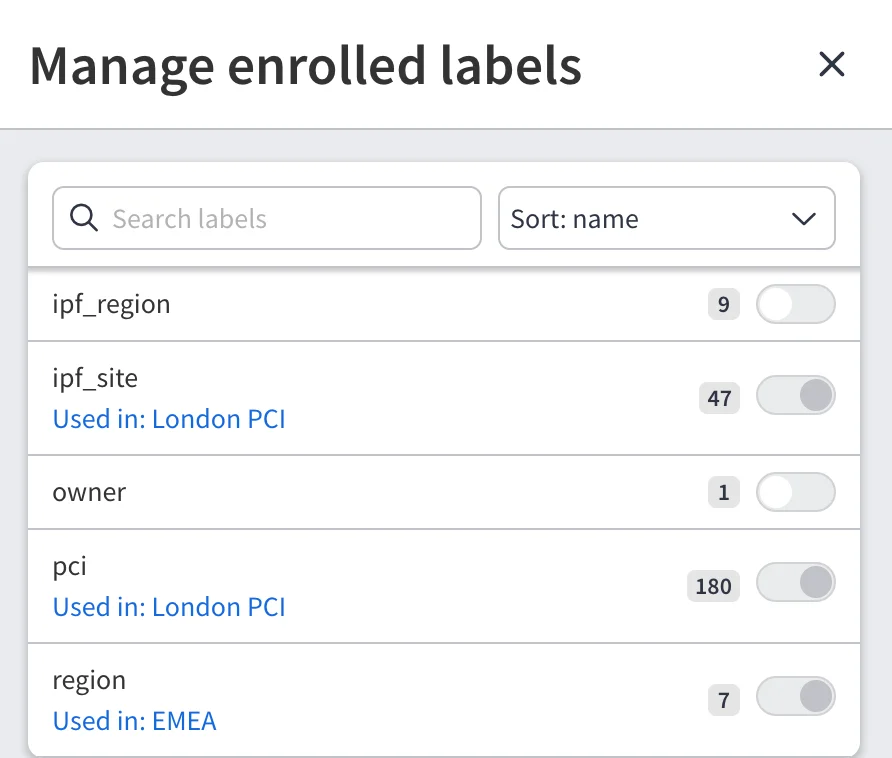
While a data policy uses a label, the label also cannot be renamed or deleted in the catalog, and values used by the policy cannot be removed from it.
Step 2: Create a Data Policy
- Go to Settings → Administration → Data policies and click + Add new.
- Enter a Policy name.
- In Policy condition, click Add condition and pick an enrolled label:
- For a label with values, select one or more values – for example,
ipf_siteisLON,PAR. The condition matches objects carrying any of the selected values. - For a label without values, the condition is is set – it matches objects carrying the label. - Add more conditions as needed. An object must match all conditions.
- Check Guarded entities in active snapshot to see how many devices and interfaces the policy admits.
- Click Save.
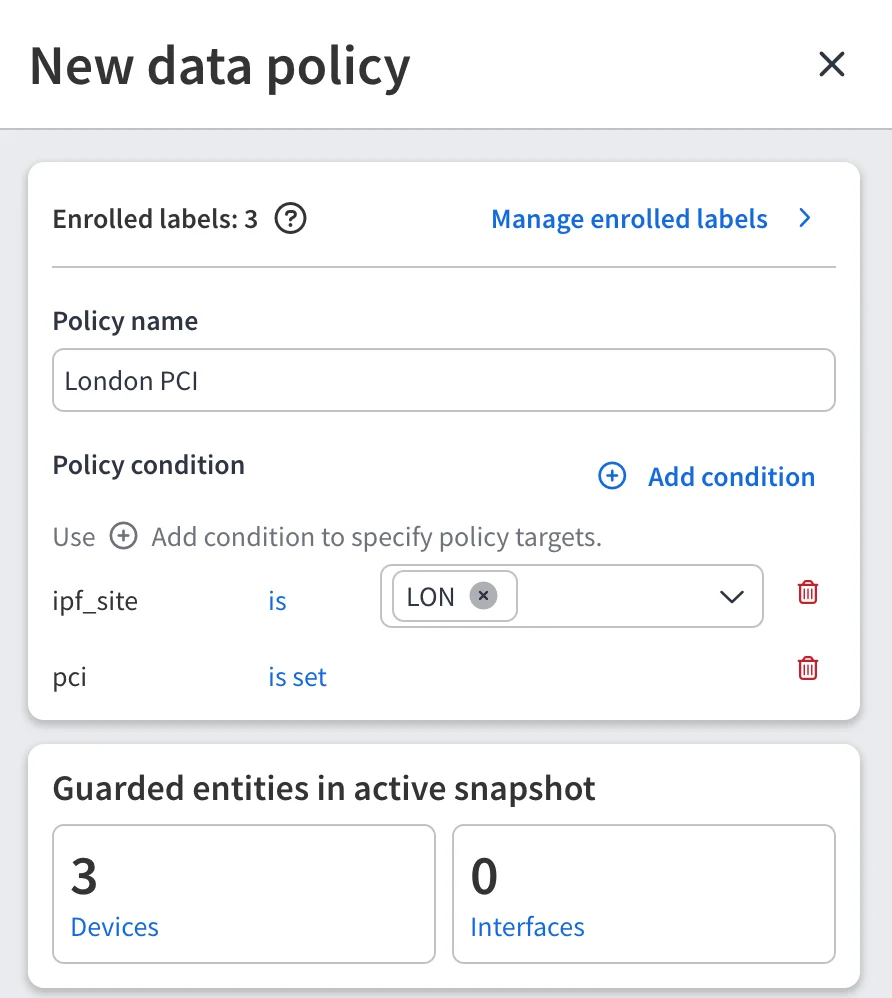
The Data policies table shows each policy’s condition – for example,
ipf_site IN [LON] AND pci IS SET – and its Impact, the number of devices
and interfaces it admits in the active snapshot.

A data policy applies to all snapshots.
Each label can be used only once in a policy. Conditions are always combined
with AND; to admit objects matching one of several conditions (OR), create
a separate data policy for each and add them all to the role.
Step 3: Assign Policies to Roles
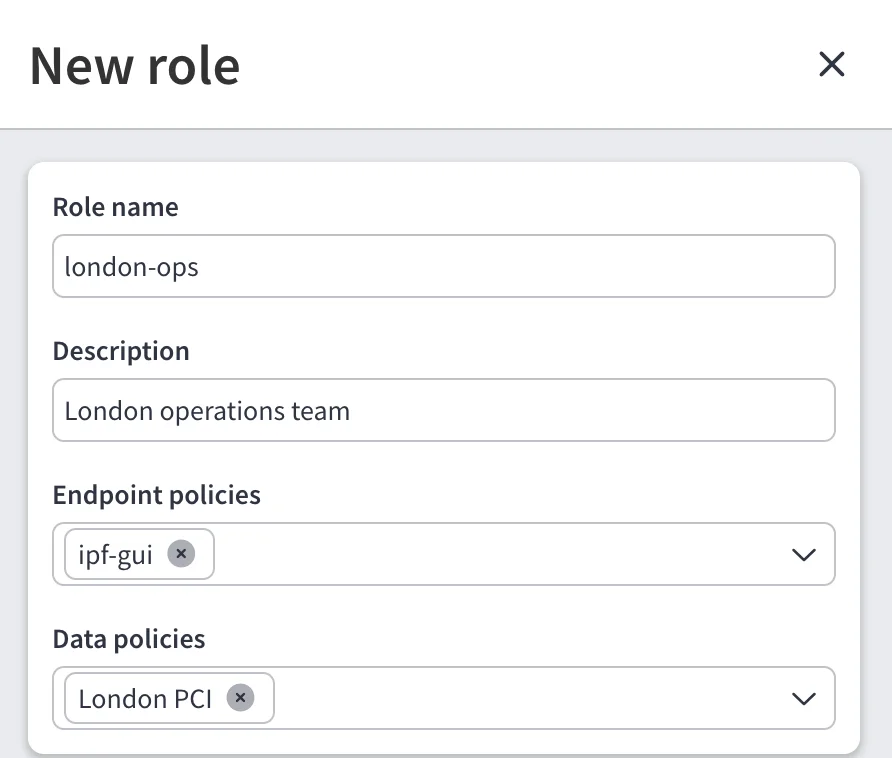
- Go to Settings → Administration → Roles.
- Add a new role or edit an existing one.
- In Endpoint policies, select the policies defining which API endpoints
the role may call. For GUI access, include the
ipf-guiendpoint policy. - In Data policies, select the policies defining which devices and interfaces the role may see.
- Save the role and assign it to users or
API tokens. Remove the built-in
ipf-guirole and any other role without a data policy from those users and tokens.
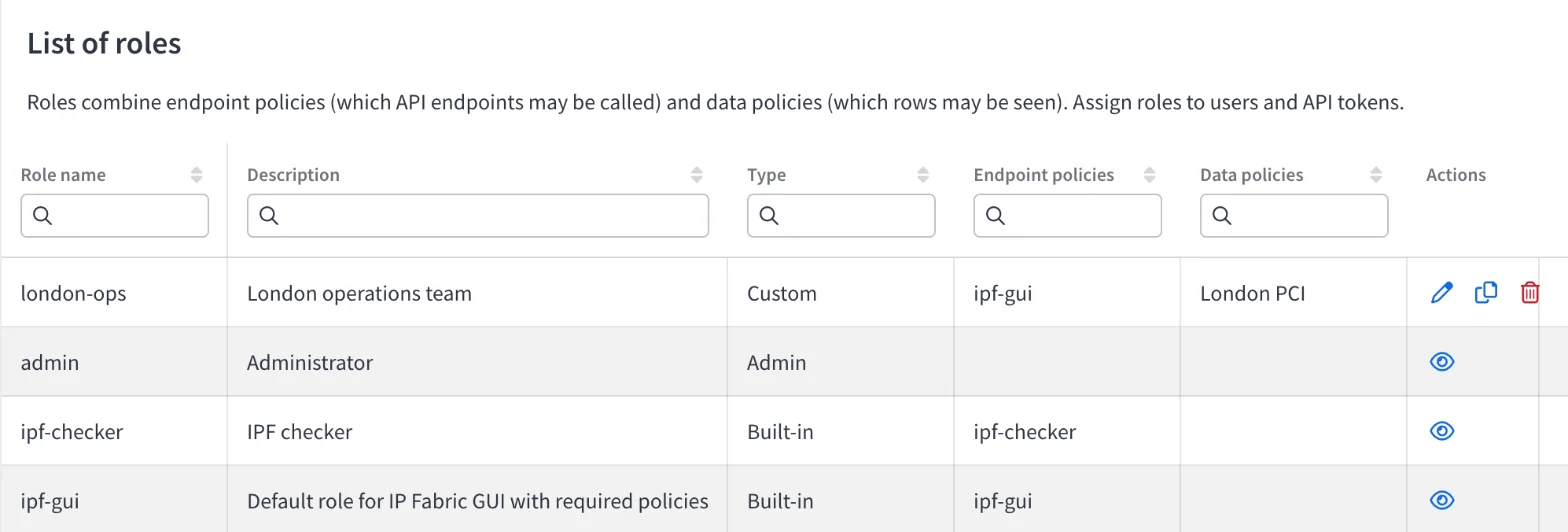
The Roles table lists the endpoint and data policies of each role. Administrator and built-in roles are read-only.
Deleting a data policy removes it from every role it is assigned to. If it was the role’s only data policy, the role then grants unrestricted access.
Endpoint Policies
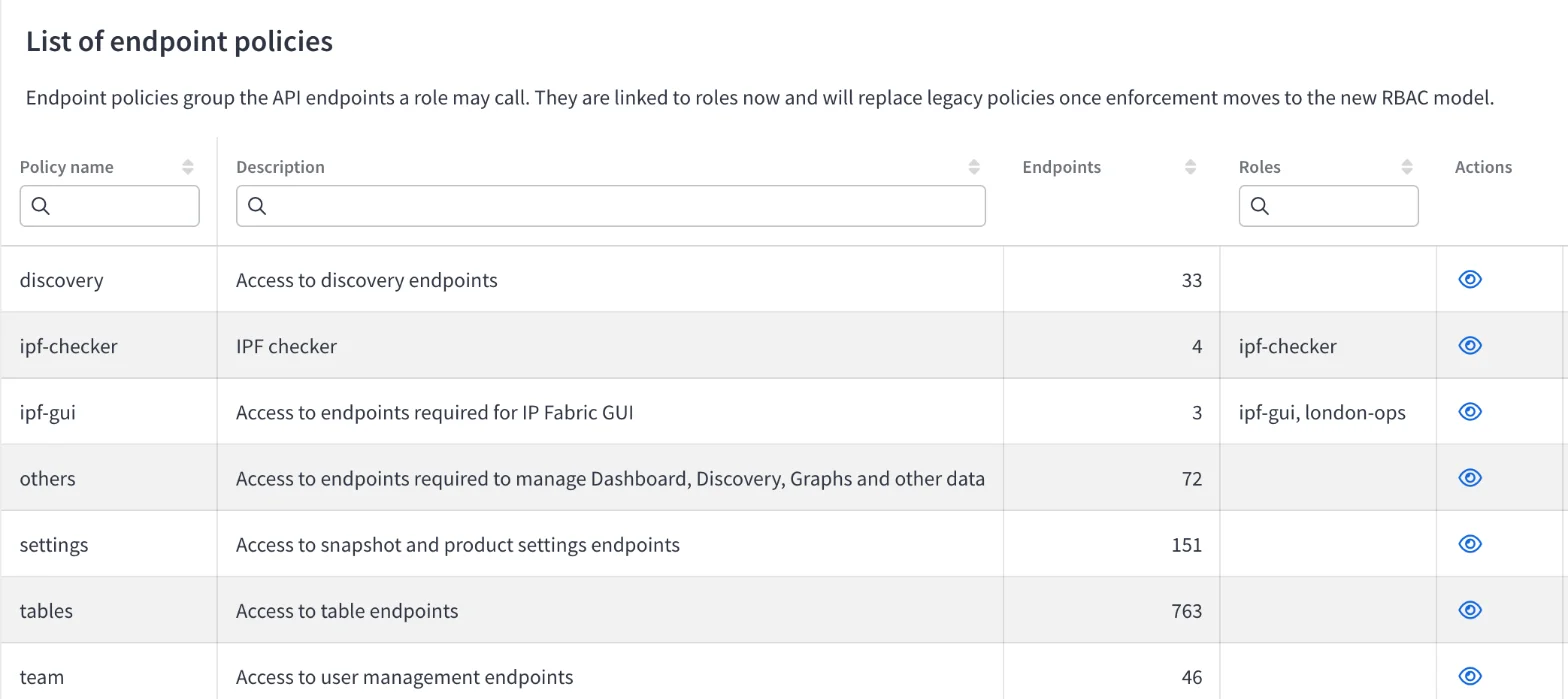
Endpoint policies group the API endpoints a role may call. They are the same API endpoint policies described in Policies, shown on a separate page so they can be linked to roles alongside data policies. The built-in policies cannot be edited or deleted.
To create one, go to Settings → Administration → Endpoint policies, click + Add new, enter a Policy name and an optional Description, and select the endpoints in Select endpoints for policy.
API
The built-in team policy grants access to the endpoints below.
| Method and Path | Description |
|---|---|
GET /labels/rbac-enrolment |
List labels with their enrolment state (query parameter snapshotId) |
PUT /labels/rbac-enrolment |
Enrol and un-enrol labels |
GET /data-policies |
List data policies |
POST /data-policies |
Create a data policy |
PUT /data-policies/{id} |
Update a data policy |
DELETE /data-policies/{id} |
Delete a data policy |
GET /data-policies/impact |
Impact counts per policy (query parameter snapshotId) |
POST /data-policies/impact/preview |
Preview the impact of a condition |
GET /endpoint-policies |
List endpoint policies |
POST /endpoint-policies |
Create an endpoint policy |
PUT /endpoint-policies/{id} |
Update an endpoint policy |
DELETE /endpoint-policies/{id} |
Delete an endpoint policy |
Enrol a Label
PUT /labels/rbac-enrolment takes a change, not the full list. Use the label
id from GET /labels:
curl -X PUT 'https://<FQDN>/api/labels/rbac-enrolment' \
  --header 'Content-Type: application/json' \
  --header 'X-API-Token: <YOUR_API_TOKEN>' \
  -d '{
    "enrol": ["<LABEL_ID>"],
    "unenrol": []
  }'
Create a Data Policy
curl -X POST 'https://<FQDN>/api/data-policies' \
  --header 'Content-Type: application/json' \
  --header 'X-API-Token: <YOUR_API_TOKEN>' \
  -d '{
    "name": "London",
    "condition": {
      "version": 1,
      "match": "all",
      "terms": [
        { "label": "ipf_site", "op": "in", "values": ["LON"] },
        { "label": "pci", "op": "exists" }
      ]
    }
  }'
| Field | Description |
|---|---|
name |
Unique policy name, 1–255 characters. |
description |
Optional description, up to 2000 characters. |
condition.version |
Always 1. |
condition.match |
Always all – an object must match every term. |
condition.terms |
At least one term, at most one per label. The label must be enrolled. |
op: "in" |
Matches objects carrying the label with any of the listed values (at least one value required). |
op: "exists" |
Matches objects carrying the label. Used for labels without values, such as pci. |
Link Policies to a Role
Use the roles API with the X-API-Version: 2 header, which adds the
endpointPolicyIds and dataPolicyIds fields. PUT requires the full role,
so first read the role:
curl 'https://<FQDN>/api/roles/<ROLE_ID>' \
  --header 'X-API-Version: 2' \
  --header 'X-API-Token: <YOUR_API_TOKEN>'
Then send it back with the data policies added:
curl -X PUT 'https://<FQDN>/api/roles/<ROLE_ID>' \
  --header 'Content-Type: application/json' \
  --header 'X-API-Version: 2' \
  --header 'X-API-Token: <YOUR_API_TOKEN>' \
  -d '{
    "name": "london-ops",
    "description": "London operations team",
    "policyIds": ["<POLICY_ID>"],
    "dataPolicyIds": ["<DATA_POLICY_ID>"]
  }'
When dataPolicyIds is omitted, data policy links are left unchanged. When
endpointPolicyIds is omitted, endpoint policy links are set from policyIds,
so send back the policyIds returned by GET. Built-in roles cannot be
changed (403).
Configuration Export and Import
Data policies, their links to roles, and label enrolment are included in the appliance configuration export and import. After an import, IP Fabric recalculates access for all loaded snapshots in the background. Until the recalculation finishes, restricted users may see rows according to the previous policies.
Limitations
- Only devices and interfaces are restricted. Cloud constructs are not.
- Conditions support
ANDonly. There is noNOTor exclusion; use separate data policies to combine alternatives. - Without a selected snapshot, impact counts and enrolled labels are not shown.